If your Dometic RV toilet is leaking at the base, the issue likely stems from a worn wax ring, a failed flange seal, or damaged valve components.
You should start by visually inspecting for loose bolts, cracks, or water pooling. Then tighten or replace seals as needed.
Cleaning and reseating the toilet with new gaskets often stops leaks. Proper tools and compatible replacement parts guarantee a solid fix.
For detailed diagnostics and repair steps, further information will guide you through precise solutions.
Key Takeaways
- Base leaks often result from flange seal failure, worn wax rings, or cracked valves causing water to seep between the bowl and base.
- Conduct visual inspections for loose bolts, water pooling, and damaged seals, using a flashlight or moisture meter for hidden leaks.
- Shut off water supply and unbolt the toilet carefully to inspect and replace the flange seal or wax ring if damaged.
- Use compatible replacement parts like Dometic flange seals and corrosion-resistant mounting hardware to ensure a durable repair.
- Perform preventive maintenance by lubricating the ball valve seal annually and checking for leaks to avoid recurring base seepage.
Common Causes of Base Leaks in Dometic RV Toilets
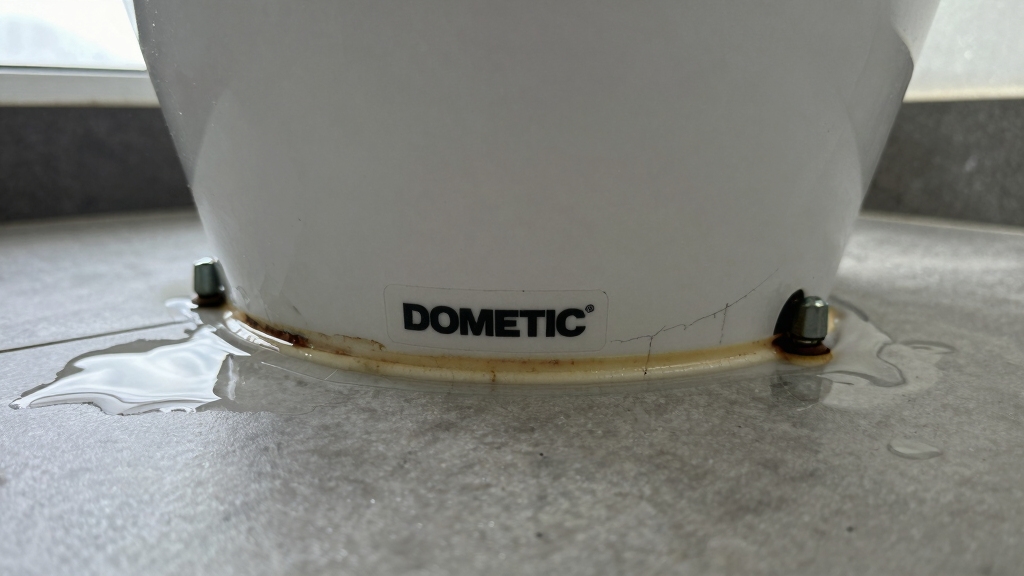
When you notice water pooling at the base of your Dometic RV toilet, it’s often due to flange seal failure, loose mounting bolts, cracked water valves, malfunctioning flush mechanisms, or installation wear.
Water pooling at your Dometic RV toilet base usually signals seal, bolt, valve, or flush mechanism issues.
A worn or misaligned flange seal allows water to seep between the bowl and base, especially if the seal is dried, cracked, or improperly reinstalled.
Loose mounting bolts let the base rock, breaking the seal; retightening 7/16-inch nuts usually stops minor leaks.
Cracked water valves, often from freeze damage or pressure, release water at the base and require full replacement since warranties exclude freeze damage.
Pedal and flush mechanism failures cause continuous water overflow, pooling at the base.
Finally, installation wear, like cracked fittings or flange damage, accelerates leaks, demanding thorough inspection and part replacement to restore a watertight seal.
Regular maintenance and inspection, including checking seals and tightening bolts, are essential steps in preventing leaks and ensuring the longevity of your RV toilet’s mounting system.
How to Diagnose a Leak at the Toilet Base?
Although diagnosing a leak at the base of your Dometic RV toilet can seem complex, following a systematic approach helps pinpoint the exact source efficiently.
Begin with a visual inspection for stains, loose bolts, or water pooling. Use functional tests like static water fill, dye flush, and listening for hissing to localize leaks. Regular maintenance including checks on seals and fittings can prevent leaks and prolong your toilet’s lifespan by maintaining proper water system integrity.
Employ noninvasive tools such as moisture meters or UV dye for subtle seepage. Regular inspections are essential to detect early signs of leaks before they cause extensive damage, ensuring timely repairs and preventing costly issues.
Regular inspections Finally, isolate sources by capping outlets or reseating the toilet with a test gasket.
| Diagnostic Step | Tools/Method | Purpose |
|---|---|---|
| Visual Inspection | Flashlight, mirror | Detect stains, hardware gaps |
| Functional Testing | Dye, pump, tissue ring | Identify active leak points |
| Noninvasive Tools | Moisture meter, UV light | Confirm hidden moisture |
| Isolation | Outlet capping, reseating | Differentiate leak sources |
Step-by-Step Repair Procedures for Base Leaks

Since a leak at the base of your Dometic RV toilet often stems from seal or flange failure, you’ll need to methodically remove the toilet, inspect all mating surfaces, and replace worn components to restore a watertight connection.
Leaks at the toilet base usually mean worn seals or flanges need inspection and replacement for a secure fit.
First, shut off the water supply and depressurize the tank to prevent spills. It is recommended to empty the holding tanks before assuming the flange seal is the culprit to avoid misdiagnosing the leak source. Maintaining proper black tank maintenance helps reduce odors and further complications during repairs.
Unbolt the toilet with the proper socket and lift it straight up to avoid damaging the seal.
Thoroughly clean and inspect the flange, bowl surface, and black tank riser for cracks or warping.
Install a new flange seal evenly, using silicone or plumber’s grease for proper seating.
Re-seat the toilet, hand-tighten nuts alternately, then torque snugly without over-tightening.
Finally, test for leaks by flushing and observing the base connection carefully. If leaks persist, consider checking for a cracked flange or contacting an RV service center for professional assistance.
Recommended Tools and Replacement Parts
If you’re dealing with a base leak on your Dometic RV toilet, don’t worry! You just need a few essential hand and specialty tools to get the job done.
Grab your adjustable wrenches, hose clamp pliers, and a torque-limiting driver. Trust me, these will make your life a lot easier. Having the right tools helps ensure a stable installation that prevents future leaks.
Now, let’s talk about the parts you’ll need to replace. You’ll definitely want to pick up some pedestal-to-bowl gaskets, ball valve assemblies, and corrosion-resistant mounting hardware that’s specifically designed for your model. Many OEM and compatible parts for Dometic toilets are available and ship quickly from Ohio, ensuring you get quality components fast.
These components are crucial for a proper fix.
Where can you find these parts? Well, you have a few options! You can check out authorized dealers, RV supply stores, or even reliable online vendors.
Just make sure whatever you choose is compatible and of good quality, so your repairs last.
Essential Repair Tools
Gather the right tools before tackling a Dometic RV toilet leak at the base to guarantee efficient and effective repairs. You’ll need hand tools for disassembly, plumbing-specific tools for hose and clamp manipulation, sealant application items, plus measurement and safety gear to ascertain a secure fit and protect yourself.
Regular inspection and maintenance of seals can prevent future leaks and extend the lifespan of your RV’s plumbing system, which is part of overall RV maintenance best practices. If you need to return any unused parts after the repair, remember that most items are refundable or exchangeable within 90 days from the date of purchase, minus shipping return policy.
| Tool Category | Key Tools | Purpose |
|---|---|---|
| Basic Hand Tools | Adjustable wrench, screwdrivers | Remove nuts, bolts, seat hinges |
| Plumbing-Specific | Hose clamp pliers, tubing cutter | Manipulate clamps, trim hoses |
| Sealant & Application | Silicone sealant, caulking gun | Resecure base seal, prevent leaks |
| Measurement & Safety | Tape measure, level, gloves | Align toilet, ensure safety |
Use these tools precisely to diagnose and fix leaks at the base efficiently.
Common Replacement Parts
Having the right tools on hand sets you up for a smooth repair, but identifying and sourcing the correct replacement parts is equally important when fixing leaks at the base of your Dometic RV toilet.
Focus on these essential components to resolve common seal failures and leaks:
1. Pedestal-to-Bowl Repair Kit
Upgrades rusty bolts and broken grommet nuts on Dometic 310/311 series, preventing liquid seepage and odors at the ceramic bowl-to-plastic pedestal joint.
2. Ball Valve Gasket
Replaces worn gaskets in the Dometic 300 series to restore the watertight seal between bowl and valve, stopping water drips.
3. OEM and Compatible Seals
Target leaks at the bowl-to-valve base connection with genuine or compatible seals, quickly addressing persistent water seepage and odors.
Use these parts specific to your model for effective, durable repairs. Always ensure proper installation and perform post-reset checks after repairs to verify leak resolution and optimal system function.
Parts Availability Sources
When sourcing replacement parts for your Dometic RV toilet, you’ll find several specialized suppliers offering a range of components tailored to different models and repair needs.
Aquastar Distributors provides key kits like the Ball and Shaft Kit 385318162 and Full China Toilet Rebuild Kit #4471014044 for various series.
United RV Parts stocks 17 parts including the Sealand Ball and Shaft Kit 385310681 and Floor Seal Kit 385311267, often with discounts and free shipping over $100.
Environmental Marine focuses on marine-compatible VacuFlush parts and offers expert support. Many of these parts, such as seal kits and cartridge replacements, come with installation instructions to facilitate proper repairs.
Dometic’s official channels list core spares and recommend product data labels for accurate orders, redirecting to their legacy or B2B platforms.
Other retailers like Dyers RV and Boat & RV Accessories round out options with seals, seats, and hoses, ensuring you can source precise parts efficiently.
Preventive Maintenance Tips to Avoid Leaks
Regularly maintaining your Dometic RV toilet is essential to prevent leaks at the base. Focus on these key tasks to keep your system leak-free:
- Seal Inspection and Lubrication: Annually clean the flush ball seal with warm water and detergent. Then apply vaseline or plumber’s grease. Test the seal by filling the bowl with hot water and ensuring no leaks occur when pressing the flush pedal. Lubricating the ball valve seal at least once a year helps prevent it from drying or cracking.
- Bowl Cleaning: After each use, remove residue with the sprayer or a small cup using toilet cleaner. For stubborn buildup, use a soft bristle brush and Dometic cleaner on the flush ball and seal. Using flexible sealants around the base can further prevent water infiltration and prolong the seal’s effectiveness.
- Water System Checks: Verify inlet flow rates are between 3.0-5.0 gpm. Clean inlet screens and ensure supply line torque is 30-40 inch-pounds. Flush multiple times after reconnection to confirm no leaks. Using a water pressure regulator when connecting to city water can protect your plumbing from pressure spikes.
When to Seek Professional Help or Consider Replacement?
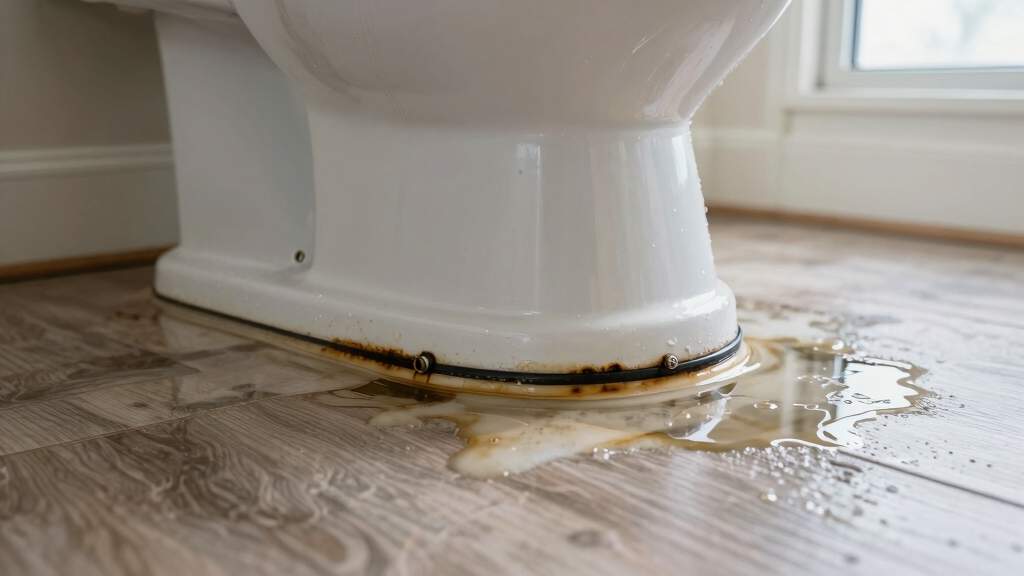
Maintaining your Dometic RV toilet can prevent many leaks, but persistent issues often signal the need for professional intervention or replacement. One common cause of leaks is a worn or damaged wax ring, which allows water to escape and pool at the base.
If leaks continue despite tightening bolts, replacing wax rings, and resealing, you face complex underlying problems like flange wear or cracked valves that require expert diagnostics. Winterizing your RV properly, including draining water supply, can help avoid freeze damage that often worsens these leaks.
Professionals identify root causes such as freeze damage or misaligned bowls, perform precise flange replacements, and pressure-test repairs to make certain leak elimination.
Delaying service risks floor damage, mold, and worsening valve cracks.
Consider full replacement when repeated leaks persist, flanges or valves are irreparable, or internal valve failures occur, especially in Dometic 300/310 series.
A new commode setup restores reliability, involving proper alignment, secure fittings, and all-inclusive leak testing to prevent future issues.
Frequently Asked Questions
Can Improper RV Leveling Cause Toilet Base Leaks?
Yes, improper RV leveling can cause toilet base leaks.
When your RV isn’t level, it stresses the toilet flange, seals, and mounting bolts unevenly. This leads to loosening or seal deformation.
This creates gaps that let water escape at the base.
To fix this, you’ll need to level your RV accurately, inspect and retighten mounting hardware, and replace any damaged seals or gaskets to restore a watertight connection.
How Does Water Quality Affect Dometic Toilet Seals?
Water quality directly impacts your Dometic toilet seals by promoting bacterial growth, chemical corrosion, and mineral buildup.
Contaminants like chlorine or pesticides degrade seal elastomers. Hard water deposits cause scale that damages surfaces and impairs lubrication.
Maintaining clean, balanced water pressure (40-50 PSI) and regularly disinfecting your system prevents seal deterioration and reduces leaks.
Monitor water sources and treat accordingly to extend seal life and ensure reliable toilet function.
Is It Safe to Use Chemical Cleaners With Dometic Toilet Seals?
You definitely shouldn’t douse your Dometic toilet seals with harsh chemicals. They’ll degrade rubber and plastic faster than a cheetah chasing prey.
Using bleach or abrasive cleaners can cause leaks and release toxic gases. Instead, opt for manufacturer-approved cleaners like Dometic’s Toilet and Seal Cleaner or enzyme-based formulas.
These maintain seal integrity, prevent odors, and protect your black water tank. Stick to gentle, specialized products to keep your system leak-free and safe.
What Is the Average Lifespan of a Dometic RV Toilet Valve?
You can expect a Dometic RV toilet valve to last around 3 to 5 years under normal use.
Factors like freezing, mechanical stress, and improper maintenance shorten its lifespan.
To maximize durability, drain water before cold weather, inspect the pivot shaft regularly, and replace seals promptly if leaks appear.
Using compatible replacement kits guarantees reliable function and prevents premature valve failure, keeping your toilet flushing efficiently longer.
Are There Any Warranty Options for Leaking Dometic RV Toilets?
Yes, you can get warranty coverage for leaking Dometic RV toilets.
Standard warranties typically last 1-2 years, with some models like the 320 Full-Timer offering extended protection.
You can also purchase an additional 24-month warranty extension for extra peace of mind.
To activate or claim warranty, register your product with proof of purchase and contact Dometic support.
They’ll guide you through service options or authorized repair centers efficiently.
Maintenance Prevents Leaks: Prolong Your Dometic Toilet Life
Leaks at the base of your Dometic RV toilet can cause serious damage if not addressed promptly.
Did you know that over 40% of RV toilet issues stem from faulty seals or loose bolts?
By regularly inspecting and maintaining these components, you can prevent costly repairs.
Follow the diagnosis and repair steps carefully, use recommended tools, and replace worn parts.
If the leak persists despite your efforts, don’t hesitate to seek professional help to protect your RV’s integrity.