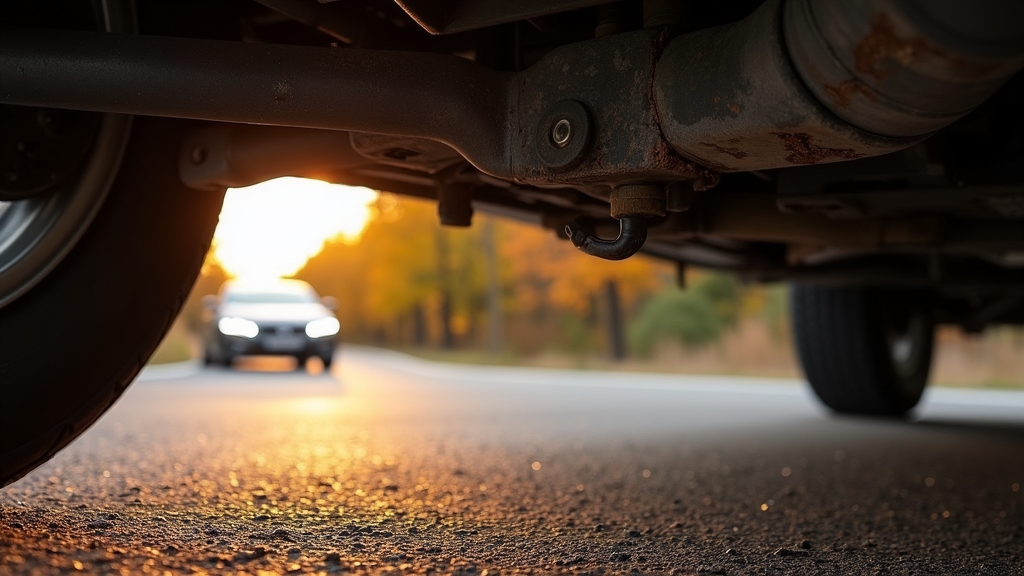
You can usually drive on a bad CV joint for a short distance—often just a few dozen to a few hundred miles—before it risks total failure.
Driving with a torn boot or damaged joint quickly accelerates wear from lost lubrication and dirt intrusion, causing vibrations, clicking noises, and potential loss of control.
Prolonged use increases repair costs and safety hazards.
Understanding the symptoms, risks, and repair options will help you avoid costly damage and stay safe.
Key Takeaways
- Driving on a bad CV joint is risky and can cause sudden failure, so limit use to short trips only if necessary.
- Early symptoms like clicking noises and vibrations worsen with continued driving, accelerating joint damage and grease loss.
- Torn boots leak grease, allowing dirt ingress that rapidly degrades the joint, shortening how long you can safely drive.
- Continuing to drive on a failing CV joint increases safety hazards including loss of vehicle control and immobilization.
- Typically, driving on a bad CV joint beyond a few hundred miles risks costly drivetrain damage and complete joint failure.
The Function of a CV Joint
Although you mightn’t see them, CV joints play a crucial role in your vehicle’s drivetrain by transferring rotational power between the transmission and the wheels at varying angles without losing speed.
They guarantee smooth torque delivery as your wheels steer and your suspension moves, maintaining constant rotational velocity to prevent vibrations and speed fluctuations. High-quality components and proper maintenance routines are essential to ensure vehicle longevity and prevent premature failure.
Typically, your front-wheel-drive car has four CV joints—two outer ball-type joints near the wheels for steering articulation and two inner tripod-type joints connecting the transmission to the axle, accommodating suspension travel. Each joint is covered by flexible plastic boots that protect the joint components from dirt and debris, but these boots are prone to wear and damage over time (CV joint boots).
By replacing older universal joints, CV joints improve driving comfort and control. Their design allows continuous power transfer through sharp turns and uneven surfaces, which is essential for responsiveness and traction.
Understanding this function highlights why their integrity is critical for safe, efficient vehicle operation.
Common Causes of CV Joint Damage
You need to watch for torn CV boots because they let grease escape and dirt in, which accelerates joint wear. Proper maintenance intervals, similar to those recommended for synthetic oil change, can help extend joint life.
Road debris can puncture or damage the boot, exposing the joint to contaminants and corrosion.
Also, your driving habits—like frequent sharp turns or rough terrain—put extra stress on the joint. This added stress speeds up its deterioration. Overloading the vehicle beyond its rated capacity can also cause premature joint failure, worsening the condition.
Torn Boots Impact
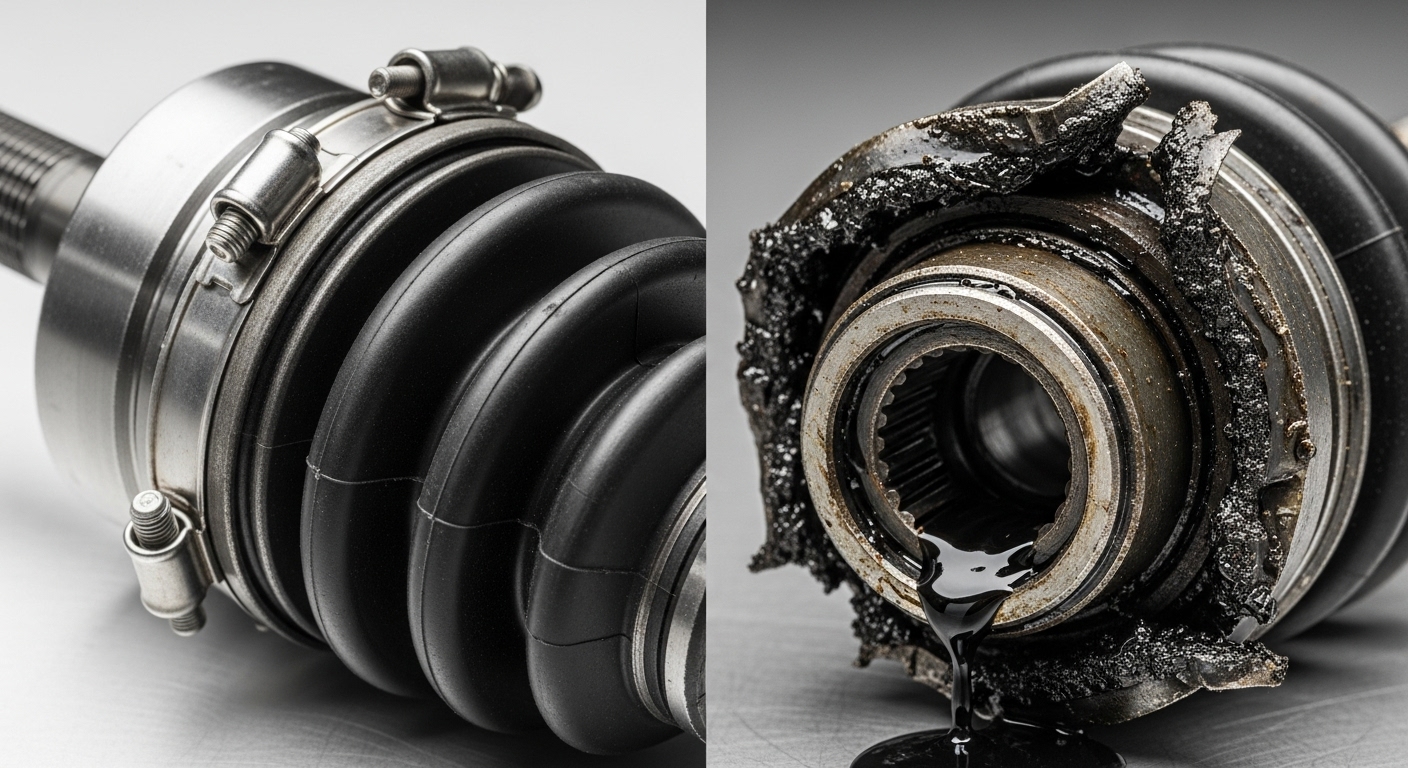
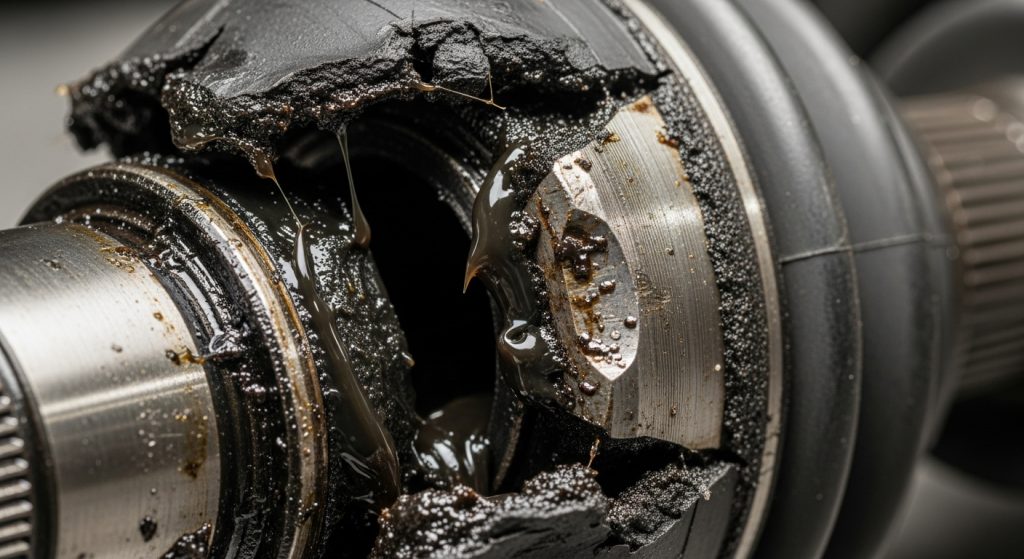
When a CV boot tears, it compromises the joint’s lubrication by allowing grease to escape and contaminants like dirt and moisture to enter. This breach accelerates wear, corrosion, and metal-on-metal contact inside the joint. You’ll notice grease splatter near the wheel well, signaling urgent attention is needed.
The boot’s protective function is essential—once torn, the joint loses lubrication rapidly, and abrasive particles infiltrate, causing friction and heat buildup. Using protective covers with weather resistance features can help prevent debris intrusion in harsh conditions. Driving with a torn boot considerably shortens the CV joint’s lifespan, often leading to failure within a few hundred to a few thousand miles.
A common sign of a worn or damaged CV joint is a vibrating sensation in the steering wheel during sharp turns. To protect your joint, inspect boots regularly for cracks or grease leaks. Avoid rough impacts, and address any damage immediately. Prompt boot repair or replacement prevents costly joint or axle failures down the line.
Road Debris Damage
Damage to CV joints isn’t limited to torn boots; impacts from road debris pose a significant threat as well.
When debris like sharp metal shards, stones, or detached vehicle parts strike the CV joint or its protective boot, they can cause cracks, tears, or grease leakage. This accelerates wear by allowing contaminants inside and reducing lubrication. Choosing parts made under strict quality standards can help mitigate premature wear caused by such damage.
To minimize road debris damage, you should:
- Inspect CV boots regularly for tears or grease loss.
- Secure cargo and vehicle parts properly to prevent falling debris.
- Avoid driving over visible debris or potholes that may cause indirect damage.
Regular inspections help identify issues early, preventing costly drivetrain repairs.
Ignoring road debris impacts can lead to joint failure, axle misalignment, and costly drivetrain repairs.
Staying vigilant and proactive helps maintain CV joint integrity and vehicle safety.
Driving Habits Effects
Although CV joints are designed to withstand regular use, certain driving habits considerably accelerate their wear. Frequent sharp turns, aggressive driving, and uneven loads increase mechanical stress on the joints. Aggressive driving involves inefficient control of the ride and neglects fuel efficiency, which can indirectly affect overall vehicle wear.
Driving on rough terrain or potholes adds to this strain, leading to accelerated deterioration. Additionally, ignoring damaged CV boots exposes joints to dirt and moisture, causing grease leakage and insufficient lubrication.
This lack of lubrication intensifies metal-on-metal contact, worsening wear. The CV joint is critical for vehicle drivetrain functionality, making its maintenance essential. Improper installation or misalignment further compounds joint stress, reducing lifespan.
To minimize damage, avoid harsh driving maneuvers, maintain proper alignment, and inspect CV boots regularly for tears or grease leaks. Adopting these habits slows joint degradation and prevents premature failure, ensuring safer and more reliable vehicle operation by reducing rolling resistance and unnecessary mechanical strain.
Signs and Symptoms of a Failing CV Joint
If you start noticing clicking or popping noises during sharp turns, it’s a clear indication that your CV joint is wearing out and struggling to maintain smooth rotation.
You might also feel vibrations through the steering wheel or experience stiffness while turning, signaling joint or axle damage. These vibrations can cause steering wheel instability, complicating vehicle control. Proper maintenance and timely repairs are essential to prevent further damage and ensure long-term vehicle reliability.
Additionally, grease leaking from a torn CV boot is a visible warning sign that the joint’s lubrication is compromised.
Key symptoms include:
- Audible clicking or popping sounds, especially when accelerating or cornering sharply
- Vibrations and jerky steering responses at various speeds
- Visible grease leakage or torn CV boots exposing the joint to contaminants
Recognizing these signs early helps you address CV joint issues promptly before they lead to severe damage or failure.
Risks Associated With Driving on a Bad CV Joint
Driving with a bad CV joint puts you at serious safety risk, including loss of vehicle control and steering difficulties. It also increases the chance of sudden joint failure, which can immobilize your vehicle and cause costly transmission damage. In addition, a failing CV joint can cause increased vibration that stresses the transmission components.
Ignoring the problem can lead to unexpected breakdowns, leaving you stranded in unsafe conditions. Addressing CV joint issues early helps prevent these hazards and expensive repairs. Regular maintenance and timely repairs ensure your vehicle remains safe and reliable on the road. Monitoring wear and tear on drivetrain components is essential to avoid catastrophic failure.
Safety Hazards
When a CV joint starts failing, you face immediate safety risks that can compromise vehicle control and stability. A damaged CV joint can cause sudden power loss to the wheels, leading to abrupt loss of control, especially during turns or high speeds. Using upgraded suspension components like shock absorbers can help maintain better handling in related vehicle systems.
Handling becomes unpredictable due to vibrations and drivetrain instability, increasing the risk of accidents. Steering may feel heavy or pull to one side, impairing your ability to react swiftly in critical moments. The CV joint is designed to transmit power while accommodating angle and speed changes, so damage disrupts this essential function.
Key safety hazards include sudden CV joint failure causing immediate immobilization or loss of drive power. Vibrations and misalignment can reduce the effectiveness of stability and traction control systems.
There is also increased mechanical strain on steering, suspension, and braking components, which can potentially lead to further failures. Prompt repair is essential to maintain safe vehicle operation and prevent hazardous situations.
Vehicle Damage Risks
Although a bad CV joint may seem like a minor issue at first, it subjects your transmission and drivetrain to uneven power loads and excessive vibrations. This accelerates wear and increases the risk of costly failures. Regular inspection with diagnostic tools can help identify problems early.
These stresses cause premature transmission wear and may halt power transfer entirely, risking severe damage at high speeds. Vibrations also accelerate wear on axle shafts and surrounding components.
This is especially true if grease leaks from a torn CV boot, exposing parts to dirt and corrosion. Loss of lubrication increases friction and heat, weakening joint integrity and raising the risk of failure. Visual signs such as torn boots or missing grease often indicate that the CV joint is deteriorating.
Additionally, abnormal vibrations strain suspension and steering systems, potentially leading to secondary failures. Ignoring a bad CV joint often escalates repair costs.
Early diagnosis and timely repair are essential to prevent extensive drivetrain damage.
Typical Lifespan and Durability of CV Joints
Since CV joints endure constant stress from steering and suspension movement, their lifespan varies widely based on conditions and maintenance. Typically, you can expect CV joints to last between 70,000 and 130,000 miles under normal driving. Regular maintenance of CV boots significantly prolongs the joint’s lifespan. Choosing durable materials and ensuring proper protection from environmental factors can further extend service life.
However, factors like driving style, environment, and quality of parts considerably affect durability. Rough terrain, aggressive driving, and extreme weather accelerate wear.
Factory joints generally outlast aftermarket replacements, which may fail around 40,000–50,000 miles. Early failures (50,000–60,000 miles) often indicate defects or unusual stress.
Understanding these aspects helps you anticipate when replacement is necessary and avoid unexpected breakdowns. Keep these points in mind to maximize the lifespan of your CV joints.
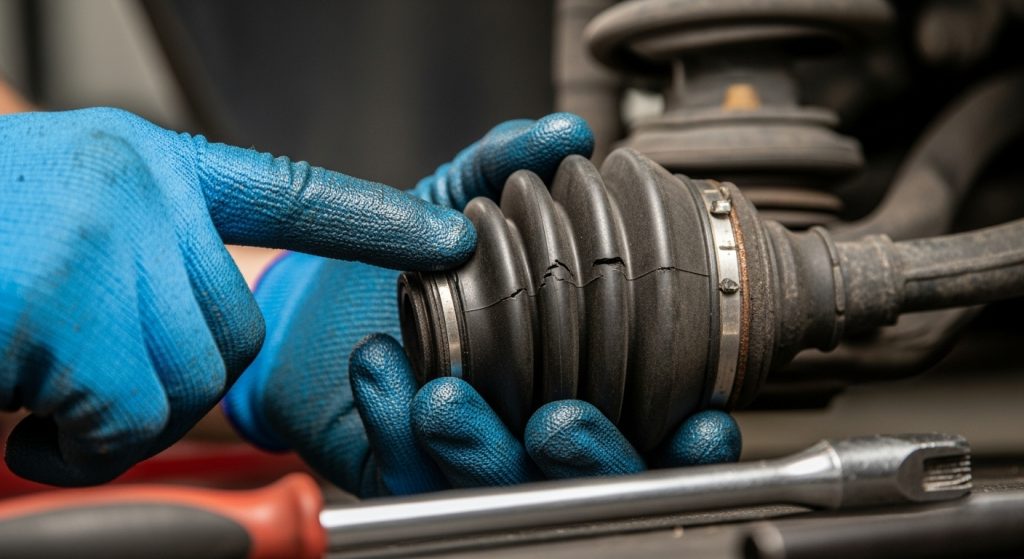
How to Inspect CV Boots for Potential Issues?
Start by visually inspecting the CV boots for cracks, tears, or any material separation. Pay special attention to areas around folds, as these spots are more prone to damage.
Check carefully for grease leaks. These often appear as splattered grease on the boot itself or on nearby components.
Identifying these issues early is crucial. It helps you address potential joint damage before it worsens. A torn boot can cause grease leaks that allow dirt and debris to enter, accelerating wear and leading to costly repairs.
Regular inspections can extend the life of your CV joints and prevent costly repairs.
Visual Boot Inspection
How can you accurately spot potential CV boot issues before they lead to joint failure? Start with a thorough visual boot inspection.
Check the boot for cracks, splits, or material hardening — these compromise sealing and accelerate damage. Confirm clamps are tight, undamaged, and corrosion-free to prevent boot detachment. Remember that CV joints are flexible couplings that rely on intact boots to keep grease in and contaminants out.
Lastly, assess the surrounding area for dirt or foreign debris that can cause premature wear.
- Examine the entire boot circumference for tears, deformation, or brittleness.
- Verify clamp security and absence of slippage or corrosion.
- Inspect adjacent suspension components for embedded contaminants or unusual residue.
Use proper lighting and wheel positioning to enhance visibility. Gently flex the boot to detect hidden weaknesses.
This hands-on approach helps you catch defects early and safeguard the CV joint’s longevity.
Checking for Grease Leaks
After checking the CV boot for visible damage, inspect for grease leaks that often signal boot failure. Use a flashlight and clean cloth to examine the inside edge of the wheel, wheel well, and nearby suspension parts for fresh or dried grease.
Grease near the wheel hub usually indicates an outer boot leak, while grease closer to the transmission or undercarriage suggests an inner boot issue. Look for splatter on tie rods, control arms, or ball joints.
Check the ground under the parked vehicle for grease stains. Heavy grease buildup means the leak has persisted, increasing contamination and accelerating joint wear. Driving with a torn CV boot risks complete CV joint failure due to loss of lubrication and dirt ingress.
Early detection lets you replace the boot alone, preventing costly CV joint damage and axle replacement. Regular inspections are critical to maintaining joint longevity.
Identifying Boot Cracks
Where should you focus your attention when inspecting CV boots for cracks? Start by examining the rubber surface closely, especially the folds and crevices where cracks often begin.
Use a flashlight to spot splits, dryness, or brittleness. These signs indicate the rubber is deteriorating and may soon fail.
Then, test the boot’s flexibility by gently twisting and squeezing it. Stiffness signals aging and potential failure, so pay close attention to any loss of pliability.
Finally, inspect the clamps securing the boot. Loose or corroded clamps compromise the seal and allow contamination inside. Removing two metal bands securing the CV boot typically requires side cutters, and care must be taken not to damage the boot or other components during this process metal bands removal.
- Look for cracks, splits, and dry, brittle rubber, especially in folds.
- Check boot pliability; stiff boots indicate imminent failure.
- Verify clamps are tight, undamaged, and properly seated to maintain the seal.
Thorough inspection helps catch early damage, preventing costly CV joint failure.
Short-Term Vs Long-Term Driving on a Damaged CV Joint
While you might manage short trips with a damaged CV joint, doing so increases noise, vibration, and accelerates wear due to grease leakage from a torn boot. Early symptoms include clicking sounds during low-speed turns, signaling joint degradation.
Short trips on a damaged CV joint cause noise, vibration, and worsen wear from grease leakage.
Short-term driving generally speeds up internal wear but may not cause immediate failure. However, long-term use considerably raises the risk of catastrophic joint failure, potentially immobilizing your vehicle. Driving with a damaged CV joint is unsafe and can lead to loss of control.
Continued grease loss and contamination accelerate bearing damage, increase vibration, and cause clunking during acceleration or deceleration.
Prolonged driving with a compromised CV joint also strains the axle shaft and suspension, leading to further mechanical issues and higher repair costs.
To maintain safe, stable vehicle operation, it’s best to limit driving on a damaged CV joint and arrange prompt replacement.
Potential Consequences of Ignoring CV Joint Problems
If you ignore CV joint problems, you risk extensive damage to your drivetrain components, including the axle, transmission, and differential. The failure can escalate repair complexity and costs, as worn joints cause secondary damage.
Additionally, safety hazards increase markedly, with the potential for sudden loss of vehicle control or wheel lock-up, especially at high speeds. You may also experience a clicking or popping sound during turns, which is an early sign of CV joint wear.
Ignoring CV joint issues also impacts your tires and steering, leading to uneven tire wear and compromised handling.
You may notice vibrations, pulling, or knocking sounds, indicating worsening conditions.
Key consequences include:
- Accelerated drivetrain wear causing costly axle or transmission repairs
- Increased safety risks like loss of control and accident potential
- Premature tire degradation and impaired steering performance
Addressing CV joint problems early helps avoid these serious repercussions.
Recommended Repairs and Replacement Options
Because CV joint wear varies by vehicle and usage, choosing the right repair or replacement option depends on factors like cost, skill level, and long-term reliability.
Full CV axle replacement is often the most practical choice. New assemblies typically cost between $60 and $250, with labor taking about 1.5 to 3 hours. This approach minimizes downtime and ensures consistent performance. Many new axles, such as those from Autozone’s Duralast Gold line, are surprisingly well-built despite not being remanufactured, providing a reliable option for replacement with new, quality parts.
Replacing the entire CV axle is cost-effective, quick, and provides reliable, long-lasting performance.
If you have mechanical experience, swapping inner joints between sides using OEM parts and fresh grease can extend axle life cost-effectively.
Repair kits offer partial joint rebuilding but require precision and are better suited for specialized repairs.
For lowered or modified vehicles, consider reinforced aftermarket axles designed for altered geometry to avoid premature failure.
Ultimately, selecting the appropriate repair hinges on balancing budget, technical ability, and vehicle-specific needs.
Tips for Preventing Premature CV Joint Failure
To prevent premature CV joint failure, you need to prioritize regular inspections and timely maintenance.
Frequently check CV boots for cracks or grease leaks to stop dirt ingress early.
Listen for clicking noises during turns and watch for vibrations that hint at joint wear.
Address any damage or grease leakage immediately to maintain proper lubrication and avoid accelerated wear.
Focus on these key practices:
- Inspect and replace damaged boots promptly to prevent contamination.
- Use recommended grease and maintain lubrication intervals, especially after harsh conditions.
- Adjust driving habits—avoid sharp turns, heavy loads, and potholes which strain joints.
- Regularly clean and inspect CV boots and joints after muddy or wet rides to ensure joint longevity.
Frequently Asked Questions
Can Weather Conditions Affect CV Joint Deterioration Speed?
Yes, weather conditions directly accelerate CV joint deterioration. Extreme heat dries out grease, causing premature wear, while cold stiffens rubber boots, increasing tear risk.
Moisture, mud, and road salts infiltrate damaged boots, promoting corrosion and abrasive damage. You’ll notice faster joint failure in harsh climates, especially with temperature fluctuations and wet conditions.
Regular inspections and timely maintenance are essential to mitigate accelerated wear caused by adverse weather exposure.
Are Aftermarket CV Joints as Reliable as OEM Parts?
You might think aftermarket CV joints are like a trusty horse-drawn carriage, but they generally aren’t as reliable as OEM parts. OEM joints usually last over 100,000 miles, while aftermarket ones often wear out around 40,000 to 50,000 miles.
Quality varies widely in aftermarket options, and poor installation can cause early vibration or failure. If you want peace of mind and durability, OEM or remanufactured joints are the smarter choice.
How Does CV Joint Failure Impact Fuel Efficiency?
CV joint failure reduces fuel efficiency by causing extra friction and drag, forcing your engine to work harder to maintain speed. This inefficiency leads to increased fuel consumption as the drivetrain experiences mechanical strain.
You’ll notice sluggish acceleration and vibrations, requiring more throttle input. Over time, the added resistance worsens gas mileage and may trigger secondary damage, further decreasing efficiency.
Addressing CV joint issues quickly helps prevent costly fuel-economy losses.
Is It Safe to Drive on a Bad CV Joint in Winter?
No, it’s not safe to drive on a bad CV joint in winter. The cold thickens grease, reduces lubrication, and increases joint stress, accelerating wear.
You risk sudden joint failure, loss of power, and compromised steering on slippery roads, which can cause accidents.
If you hear clicking or notice pulling, stop driving immediately. Get the CV joint inspected and repaired before winter worsens the damage and safety risks.
What Tools Are Needed for DIY CV Joint Inspection?
Think of your DIY CV joint inspection as surgery—you’ll need precise tools to get under the hood. Grab screwdrivers, pliers, and wire cutters to remove clamps and boots.
Use a hydraulic jack and jack stands to safely lift and support your car.
Clean parts with brake cleaner and wire brushes.
For reassembly, a torque wrench, snap ring pliers, and grease gun guarantee everything fits tight and runs smooth.
Safety glasses and gloves protect you throughout.
Don’t Wait for CV Joint Failure – Act Now
You wouldn’t want to risk a complete CV joint failure, would you? Driving on a bad CV joint even short-term can cause serious damage and compromise your safety.
While some joints hold up briefly despite wear, ignoring symptoms only leads to costly repairs and potential accidents. Act promptly—inspect, repair, or replace as needed to maintain your vehicle’s performance and avoid unexpected breakdowns.
Don’t gamble with your drive or your safety.