To check a fan clutch, start with a visual inspection for leaks, damage, or looseness. Make sure the engine is cool, then spin the fan by hand to feel resistance and check for smooth rotation.
Run the engine and observe fan engagement as temperature rises, using a tachometer to measure RPM changes. Look for signs like overheating, unusual noise, or fan spin after shutdown that indicate failure.
Understanding these basics will help you diagnose fan clutch issues accurately.
Key Takeaways
- Inspect fan clutch for fluid leaks, wobble, or damaged blades to identify physical or mechanical failure signs.
- Spin fan by hand when engine is cold; it should offer slight resistance and not spin freely or with excessive play.
- Warm engine to operating temperature and observe fan engagement; fan speed should increase as temperature rises.
- Use a tachometer to measure fan RPM relative to engine speed; 80–90% indicates engagement, 20–30% indicates disengagement.
- Stop a fan blade gently at idle and count revolutions after shutdown; excessive spin-down shows clutch wear or failure.
Required Tools and Preparation
Before you begin checking a fan clutch, gather all necessary tools and prepare your workspace to guarantee efficiency and safety.
Start by verifying tool compatibility with your fan clutch type: standard, reverse, or thermal. Check the vehicle classification, whether it’s a passenger vehicle or a heavy-duty truck.
Essential hand tools include fan clutch spanner wrenches, universal pulley holders, and combination wrench sets. Specialty tool kits like the GEARWRENCH 8-piece or ATCL-706 provide precision for bolt-on and press-on pulleys. The GEARWRENCH 8-piece set comes with a patented universal pulley holder that covers various fan clutch types, including newer Chrysler engines with press-on pulleys.
Support tools such as telescoping magnetic pickups and inspection mirrors improve accessibility and retrieval of dropped parts.
Make certain your workspace is level, the engine is cool, and you have proper lifting equipment like a 6-ton hydraulic jack and jack stands.
Use tools with corrosion-resistant finishes to prolong service life and maintain safety throughout the procedure.
Visual and Physical Inspection Procedures
Regularly performing a thorough visual and physical inspection of the fan clutch guarantees early detection of potential failures.
Begin by checking for fluid leaks around the clutch hub and seals, as any seepage signals internal failure.
Inspect fan blades and the hub for cracks, chips, or warping that can cause imbalance.
Examine for corrosion or rust on the housing and confirm the fan shroud and ducting are intact and unobstructed.
Physically, rock the fan assembly axially and radially to detect play, and rotate it by hand to assess smoothness and resistance.
Note any gritty rotation, excessive wobble, or unusual sounds.
Finally, inspect seals, mounting hardware, and electrical connectors for damage or looseness that might compromise clutch operation and alignment.
Also, ensure that no harsh chemicals such as ammonia-containing fluids have been used near the fan clutch, as they can accelerate deterioration of rubber seals and plastic components.
Running Engine Testing Methods
After completing a detailed visual and physical inspection, you’ll need to evaluate the fan clutch’s performance under actual operating conditions. Proper inspection and maintenance practices are crucial, similar to how regular vehicle suspension checks help prevent premature component failure.
Start the engine and observe fan spin behavior at idle and increased RPM. For thermally-controlled clutches, it is important to note that fan speed should increase as the engine bay temperature rises.
Check for resistance by gently stopping a blade with a gloved hand and note spin-down revolutions immediately after shutdown.
Warm the engine to operating temperature, then monitor fan engagement as temperature rises.
Use diagnostic tools to confirm ECU commands align with fan activity.
| Test Type | Method | Expected Result |
|---|---|---|
| Spin-Down | Count revolutions after shutdown | ≤1–2 revolutions at idle |
| Resistance Check | Stop blade briefly by hand | Strong resistance indicates engagement |
| Temperature Response | Observe fan speed at operating temp | Fan speed increases with RPM and temp |
| Thermal Actuation | Check bimetal movement or ECU data | Visible actuation or command match |
| Load Response | Monitor coolant temp under load | Fan speed increases as temp rises |
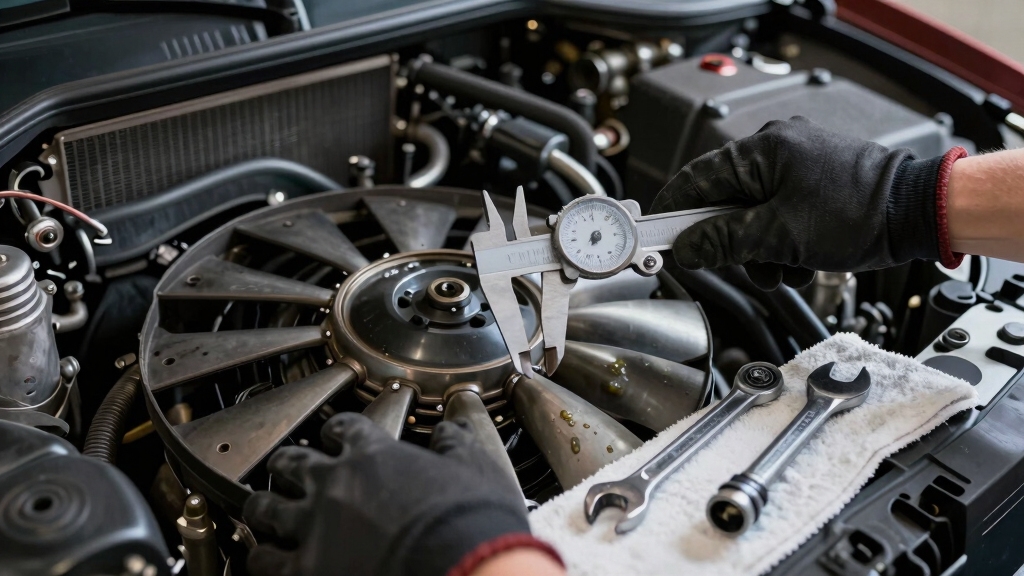
RPM and Temperature Measurement Techniques
Accurately measuring fan clutch RPM alongside engine temperature is essential to diagnose clutch engagement and performance.
Use a calibrated non-contact tachometer, applying reflective tape on a fan blade if direct measurement isn’t possible, to obtain multiple RPM readings for accuracy. Understanding rotational speed patterns helps distinguish proper clutch function from malfunction.
Begin by recording engine shaft RPM with a pointed tip on the motor end. Then measure fan blade RPM using a convex tip to prevent skipping.
Employ infrared thermometers to monitor radiator and thermostat temperatures before and after revving the engine. Adding a DS18B20 temperature sensor near the fan allows direct measurement of fan temperature, giving more precise insight into clutch behavior.
Calculate RPM via pulse frequency from optical or IR sensors, adjusting for blade count.
Correlate RPM values. 80-90% of shaft speed indicates engagement; 20-30% suggests disengagement.
A lack of RPM increase despite rising temperature signals clutch malfunction.
This combined approach guarantees precise fan clutch diagnostics.
Identifying Failure Symptoms and Replacement Guidelines
When your engine shows signs of overheating at low speeds or idle but cools normally at highway speeds, the fan clutch mightn’t be engaging or disengaging properly.
Check for excessive fan noise, wobble, or looseness in the fan assembly, as these indicate clutch or bearing failure.
Inspect the clutch housing for visible fluid leaks, which signal internal seal failure requiring replacement.
Spin the fan by hand when the engine is off; free spinning suggests clutch malfunction.
If the fan continues spinning after engine shutdown, replace the clutch.
Also, monitor for reduced engine power or increased fuel consumption caused by constant fan engagement, as this creates an unnecessary parasitic load on the engine.
Replace the clutch when mechanical faults or persistent drivability issues remain after verifying other cooling components.
Regular inspection and maintenance help prevent premature fan clutch failure and avoid potential engine damage.
These steps guarantee reliable cooling and prevent engine damage.
Frequently Asked Questions
How Often Should a Fan Clutch Be Inspected or Serviced?
You should inspect the fan clutch at every major service interval or at least annually, especially during oil changes if intervals are short (5,000–10,000 miles).
Always check it immediately when you notice overheating, unusual noises, or vibration.
If your vehicle endures heavy loads or towing, inspect more frequently.
Follow OEM guidelines for commercial vehicles, typically every 25,000 miles.
Keep detailed records to track wear and replace the clutch when limits are met.
Can a Faulty Fan Clutch Affect Fuel Efficiency?
Yes, a faulty fan clutch can affect your fuel efficiency.
When it sticks engaged or drags excessively, your engine works harder to spin the fan, increasing fuel consumption, especially during low-speed driving or towing.
You’ll notice reduced acceleration and higher engine load.
To maintain peak fuel economy, inspect for free spinning or binding, and replace any clutch showing signs of wear, wobble, or fluid leakage promptly.
Is It Possible to Repair a Fan Clutch or Only Replace It?
You can repair a fan clutch if the core housing, pulley, and mounting surfaces aren’t damaged.
Rebuild kits replace worn friction material, bearings, seals, or thermal springs, but you’ll need proper parts, tools, and skill.
However, catastrophic damage or sealed units often require full replacement.
Evaluate cost, time, and part availability before deciding.
What Are the Differences Between Heavy-Duty and Standard Fan Clutches?
You’ll notice heavy-duty fan clutches offer higher engagement speeds, turning the fan 70-90% of shaft speed, while standard ones engage at 50-70%.
Heavy-duty designs handle deeper pitch fans (around 2-1/2″), providing greater cooling efficiency.
They feature larger surface areas (up to 47 sq. in.) with land/groove designs.
Standard clutches suit lighter pitch fans (1-1/2″) and have smaller, flat plate impellers, making them ideal for less demanding cooling needs.
How Does Ambient Temperature Influence Fan Clutch Performance?
Ambient temperature directly affects your fan clutch’s engagement.
As temps rise, the clutch locks up more to increase fan speed, compensating for reduced air density and higher cooling demand.
In cooler conditions, it disengages to save energy and reduce wear.
Rapid temperature swings cause clutch cycling, potentially increasing wear.
Understanding this helps you anticipate clutch behavior, optimize cooling, and prevent premature clutch failure in varying climates.
From Inspection to Repair: Plan Your Next Move
By boldly balancing basic tools and thorough techniques, you can confidently check your fan clutch’s condition.
Start with a solid visual and physical inspection, then smoothly shift to running engine tests, measuring RPM and temperature with precision.
Pinpoint potential problems promptly by recognizing failure symptoms.
Remember, regular routine reviews reduce risks and reinforce reliability.
Follow these focused, factual steps to guarantee your fan clutch functions flawlessly, fostering fan functionality and forestalling future failures.