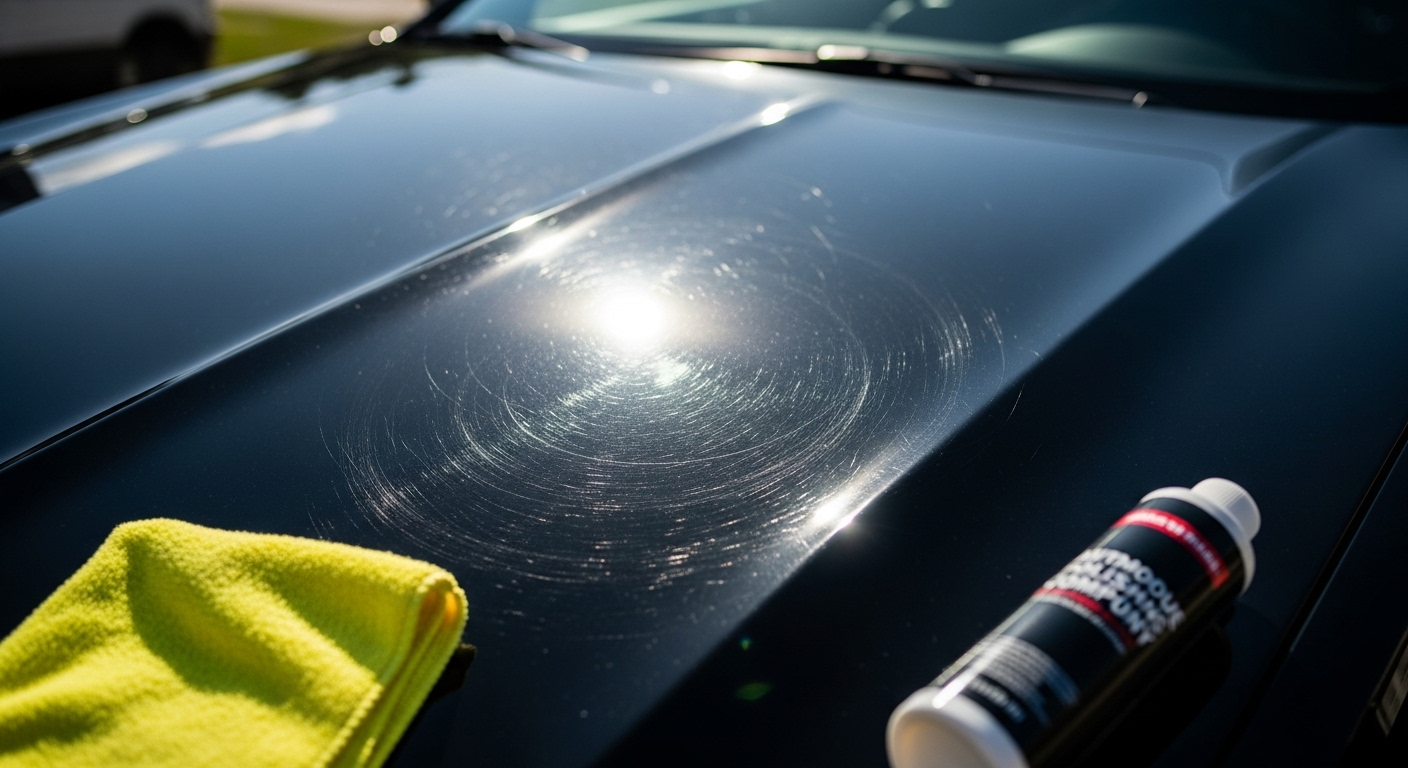
To get rid of swirl marks on your car, start by thoroughly washing and decontaminating the paint using proper techniques like the two-bucket method and clay bar treatment. Choose the right polish—liquid, paste, or spray—based on swirl severity, and use a dual-action polisher with suitable pads at low speed to carefully correct imperfections. Finish by applying a quality wax or sealant for protection. Following these steps prevents damage and maintains gloss. Explore advanced methods for even better results.
Key Takeaways
- Thoroughly wash and decontaminate the car surface using the two-bucket method, pre-wash cleaner, and clay bar to remove embedded debris.
- Use a suitable polish (liquid, paste, or spray) and a dual-action buffer with proper pads to correct swirl marks effectively.
- Work in small sections with consistent speed, pressure, and lubricity, followed by a finishing polish to enhance gloss and remove haze.
- Apply wax or paint sealant after polishing to protect the paint and prevent future swirl marks.
- Maintain proper washing and drying techniques, avoid circular motions, and use clean microfiber towels to minimize swirl mark formation.
Preparing Your Car for Swirl Mark Removal
Before you begin removing swirl marks, you need to prepare your car thoroughly to prevent additional damage during the process. Start by rinsing the vehicle with a pressure washer or hose to remove loose dirt and grime.
Apply a pre-wash cleaner that breaks down and suspends debris without touching the paint. Follow this with snow foam application to extend dwell time and loosen stubborn grime, ensuring you rinse thoroughly once the foam begins to dry. Snow foam dwells for a few minutes; agitation with a trim brush enhances cleaning, which helps ensure a deeper clean before washing.
After washing, inspect the surface for embedded contaminants. Use an iron fallout remover to dissolve metal particles and follow with a clay bar treatment, lubricating the surface to avoid scratches.
Finally, dry the car completely with clean microfiber towels, remove water spots, and mark swirl mark areas before proceeding to polishing.
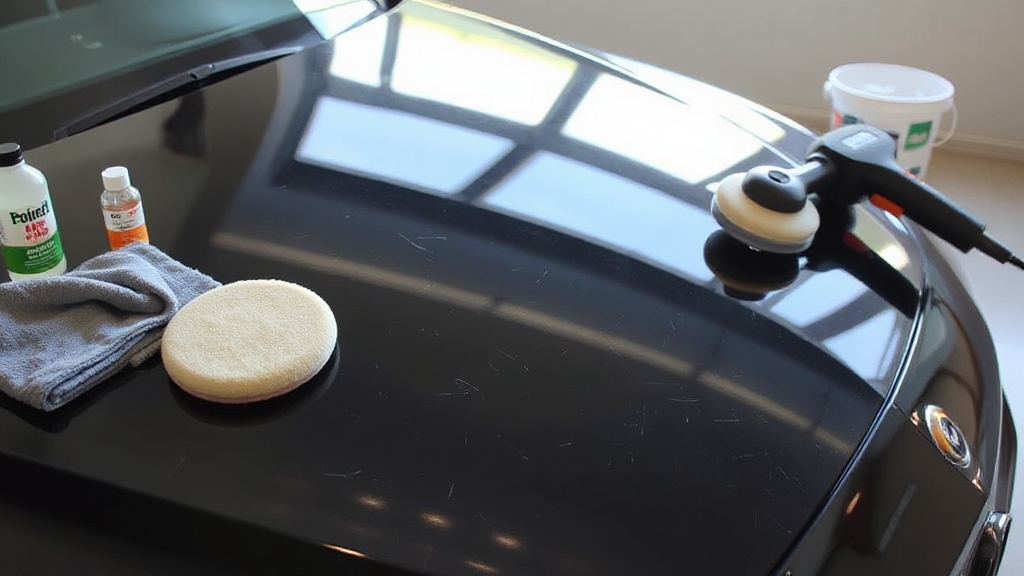
Essential Tools and Materials Needed
When removing swirl marks, having the right tools and materials is vital to achieve effective and safe paint correction. You’ll rely heavily on specialized equipment to ensure precision and efficiency.
- Polishing Machines and Pads: Use dual-action or cyclo polishers paired with foam or wool pads, selecting pad types based on swirl severity. Machine polishing is more efficient for deep correction and provides consistent pressure for uniform results, making it the preferred method for swirl removal.
- Compound and Polishes: Choose swirl remover compounds and polishes graded for the depth of scratches. Products like Meguiars Ultimate Compound utilize advanced abrasive technology and are effective for correction, but hand application can introduce uneven pressure, limiting results and making machine use safer and faster.
- Microfiber Towels: Employ these for residue removal without scratching the surface.
- Safety Gear and Workspace Setup: Wear gloves and safety glasses, and work in a shaded, well-ventilated area to protect yourself and maintain product integrity. Proper assessment of paint condition is essential before correction, especially for older finishes where abrasive products may risk going through the clearcoat, requiring careful product selection.
These essentials provide the foundation for professional-level swirl mark removal with minimal risk to your car’s paint.
Cleaning and Claying the Paint Surface
Start by thoroughly washing your car with a mild soap to remove loose debris and prevent damaging the paint. Choosing the right cleaning materials can avoid introducing new contaminants that affect the surface integrity.
Next, use a clay bar with proper lubrication to decontaminate the surface by removing embedded contaminants that washing alone can’t eliminate. Clay barring is crucial for removing surface contaminants that hinder polishing results.
This preparation ensures a smooth, clean surface essential for effective polishing and swirl mark removal. Maintaining a contaminant-free surface is fundamental, similar to how air filters protect engines by preventing particulate buildup that impairs performance.
Thorough Washing Techniques
Although swirl marks may seem like a minor issue, thorough washing combined with claying is crucial to effectively remove loose dirt and embedded contaminants without causing further abrasion. This process prepares the surface for polishing and prevents additional micro-scratches.
Follow these steps for superior cleaning:
- Rinse the vehicle thoroughly to eliminate loose debris. Using pressure washer detergents specifically designed for vehicles can enhance the rinsing process without damaging the paint.
- Use the two-bucket method with a high-quality soap and microfiber mitt, rinsing the mitt frequently to avoid contamination.
- Dry the car completely with a clean microfiber towel or air blower to prevent water spots.
- Apply a detailing lubricant and gently glide the clay bar over small sections, kneading regularly and wiping residue with a microfiber towel. This step is especially important before polishing because proper product breakdown ensures the polishing compound works effectively without causing damage.
This ensures a smooth, contaminant-free surface, maximizing polish effectiveness and swirl mark removal.
Clay Bar Benefits
A clay bar provides a critical step in cleaning and preparing your car’s paint surface by effectively removing embedded contaminants that traditional washing can’t eliminate. It extracts water spots, brake dust, metal particles, and road grit, smoothing the surface and restoring paint clarity.
This process enhances gloss and reveals the true color depth, making your paint look vibrant and reflective. Using a clay bar creates an ideal bonding surface, ensuring waxes and polishes adhere better, which leads to longer-lasting protection and more efficient polishing.
It is recommended to perform clay bar treatment at least twice a year as a decontamination step before waxing to maintain paint health. Regular claying also prevents future damage by removing harmful debris before it embeds.
Overall, claying streamlines detailing, reduces product usage, and preserves paint integrity, making it an indispensable step for achieving a flawless, swirl-free finish. Understanding the importance of filtration efficiency in removing contaminants can similarly apply to maintaining a clean and protected paint surface.
Surface Decontamination Steps
Before you begin decontaminating the paint surface, make certain the vehicle is thoroughly washed using a pH-neutral shampoo to protect existing coatings. Use the two-bucket method and dry with microfiber towels in the shade to avoid water spots.
Next, apply chemical decontaminants like iron or fallout removers; spray evenly and rinse thoroughly before drying. These products are essential for maintaining vehicle appearance and paint longevity.
For mechanical decontamination, select an appropriate clay tool and always use a dedicated clay lubricant to prevent micro-scratches. Work methodically in sections, folding the clay to expose clean surfaces.
Follow these steps for effective decontamination:
- Wash with pH-neutral shampoo using the two-bucket method.
- Apply chemical decontaminants; rinse before drying.
- Clay the surface with lubricant, light pressure.
- Re-wash and dry with microfiber towels.
Choosing the Right Polishing Products
You need to select the correct polish type based on the severity of the swirl marks and paint condition. Heavy cut polishes handle deep scratches, while medium or fine cuts work for moderate surface imperfections. Always match the abrasiveness level to your car’s paint type to avoid damage and achieve the best results.
For beginners, using products with diminishing abrasive technology can help minimize the risk of new scratches while providing effective swirl removal. Proper maintenance frequency of polishing products ensures optimal protection and longevity of your vehicle’s finish.
Polish Types Explained
When selecting the right polish to remove swirl marks, understanding the differences between liquid, paste, and spray formulations is essential. Each type offers unique benefits suited to specific applications.
- Liquid polishes spread easily, ideal for beginners and hand application, but may require multiple passes for deeper swirls. For example, products like TurtleWax Renew Polish are cost-effective and easy to apply but may need repeated use for best results.
- Paste polishes provide better control and longer-lasting shine, with thicker consistency and less splatter during machine use. This consistency helps in maintaining optimal surface refinement during polishing.
- Spray polishes suit quick spot treatments and maintenance but lack correction power for heavy swirl marks.
- Polishes primarily refine paint surfaces by leveling minor imperfections; they’re not the same as waxes or compounds, which serve protection or aggressive correction roles.
Choose based on your paint’s condition, application method, and desired finish to optimize swirl mark removal effectively.
Abrasiveness Levels Matter
Understanding the abrasiveness level of polishing products directly impacts how effectively swirl marks are removed without harming your car’s clear coat. Abrasiveness refers to the size and type of abrasive particles in a product, dictating how much clear coat it removes.
Selecting a product with the correct abrasiveness is vital: mild abrasives gently eliminate minor imperfections, while more aggressive abrasives target deeper scratches but risk causing micro-scratches or clear coat degradation if misused. Always start with the least abrasive option suitable for the swirl marks you want to remove.
Proper technique, including controlled pressure and consistent motion, complements the abrasiveness level to optimize swirl mark removal while preserving paint integrity. Many automotive maintenance experts recommend using products that meet specific performance standards to ensure effective and safe paint correction.
Measuring paint thickness with a paint gauge is crucial to estimate existing clear coat and avoid over-polishing, helping to ensure that clear coat isn’t excessively removed during correction paint thickness measurement. Test the product on a small area to assess its effect before a full application.
Matching Polish To Paint
Although selecting the right polish depends on multiple factors, matching it precisely to your car’s paint type and color guarantees ideal results. First, identify your vehicle’s paint code for accurate color matching. Then, choose a polish compatible with your paint type—metallic or pearl require different formulations.
Consider polishes with UV protection to prevent fading and those that enhance gloss for a polished finish. Use color measuring tools if available for precision.
Follow these steps:
- Verify paint code via vehicle or online resources.
- Select polish based on chemical compatibility with paint type.
- Opt for products with UV protection and gloss enhancement.
- Use spectrophotometers or color blending techniques for uniform appearance.
This targeted approach guarantees swirl marks are removed effectively without compromising paint integrity. Additionally, understanding the role of oxidative stability in product formulation helps in choosing polishes that maintain their effectiveness and protect the paint over time.
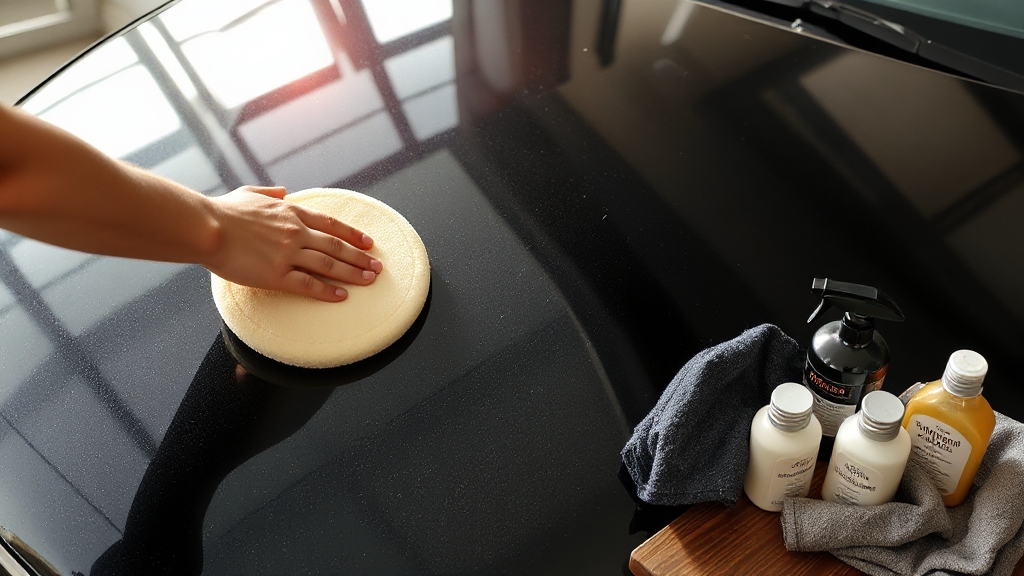
Techniques for Effective Polishing
Before you begin polishing, you must prepare the surface meticulously by cleaning the vehicle and removing contaminants with a clay bar. This step ensures a glass-smooth surface free of embedded dirt and debris, which allows for optimal polishing results.
Apply a fast-cutting polish like V36 to address swirl marks, then follow with a finishing polish for a glossy finish. Use a Dual Action polisher at consistent speed and pressure, working in small sections to avoid drying.
Lighten pressure with the finishing polish and inspect your work under varied lighting. Avoid aggressive techniques to prevent holograms and use finer polishes to eliminate haze. Maintaining proper lubricity benefits during polishing can help protect the paint surface and improve the overall finish.
| Step | Product Type | Key Instruction |
|---|---|---|
| Surface Prep | Clay Bar | Remove contaminants thoroughly |
| Correcting Defects | Fast-cut polish (e.g., V36) | Use consistent speed & pressure |
| Refinement | Finishing polish | Apply at lower speed |
| Protection | Wax/Sealant | Protect paint post-polishing |
Using a Buffer Safely and Efficiently
Polishing effectively sets the stage for using a buffer to remove swirl marks and refine the paint’s finish. To use the buffer safely and efficiently, follow these steps:
Polishing prepares your vehicle for buffing, essential for removing swirl marks and enhancing paint shine safely and effectively.
- Start with a low speed setting to maintain control and minimize paint damage risks.
- Work systematically in small sections to ensure even coverage and prevent missing spots, similar to how systematic maintenance enhances air intake performance.
- Always apply polish to the buffer pad, not directly on the surface, for consistent distribution.
- Keep the buffer pad clean and debris-free to avoid creating new scratches during operation.
Choose a random orbital buffer for safer DIY use, and ensure the vehicle is clean and dry before starting. Proper lubrication during polishing reduces the risk of micro scratches, enhancing overall paint protection and appearance.
Avoid over-buffering by stopping once swirl marks have been effectively removed, preserving the paint’s integrity.
Applying Wax for Long-Lasting Protection
When you apply wax to your car’s surface, you create a durable protective layer that shields the paint from UV rays, contaminants, and moisture. Begin by ensuring the surface is clean and dry. Use only clean towels to prevent micro-abrasions during application.
Choose a wax type—synthetic for durability or natural for a deeper shine—based on your needs. Apply the wax in thin, even layers using a microfiber cloth, working in circular motions. Avoid direct sunlight to prevent premature drying. Regular waxing complements preventive maintenance to keep your vehicle in top condition.
After applying, buff the surface thoroughly to achieve an even, glossy finish. Regular waxing not only protects against environmental damage and reduces maintenance but also preserves color vibrancy and gloss.
This consistent protection helps maintain your car’s paint quality over time, preventing swirl marks from reappearing and enhancing its overall appearance.
Tips to Prevent Future Swirl Marks
Although swirl marks can be minimized through correction, preventing them requires adopting careful washing and drying techniques. You must control every step to protect your car’s paint effectively.
Follow these essential tips:
Follow these essential tips to protect your car’s paint and prevent swirl marks effectively.
- Wash in straight lines using a soft sponge or mitt, avoiding circular motions to prevent scratches.
- Rinse thoroughly and never use household cleaners, which may contain abrasive particles. Incorporating the two-bucket method during washing helps minimize contaminant transfer and reduces the risk of swirl marks.
- Dry with clean microfiber towels in straight lines, utilizing drying aids to reduce water spots.
- Apply protective measures like paint sealants and use car covers when parked to shield the surface from contaminants.
Frequently Asked Questions
Can Swirl Marks Appear on All Car Paint Colors?
Yes, swirl marks can appear on all car paint colors because they affect the clear coat layer. However, you’ll notice them more easily on dark colors like black or Jet Black due to higher contrast.
Light colors, such as white, tend to hide swirl marks better. Metallic paints may show them less prominently because the metallic particles scatter light.
How Long Does Swirl Mark Removal Typically Take?
You’ll spend 6 to 8 hours on minor swirl removal.
12 to 15 hours tackling moderate defects.
And over 20 hours for severe corrections.
The time depends on your paint’s condition, swirl severity, vehicle size, and tools you use.
Professionals with quality equipment work faster, but expect a full paint correction to take several days.
Regular maintenance cuts down future repair times and keeps your finish smooth.
Are Swirl Marks Harmful to the Car’S Clear Coat?
Yes, swirl marks are harmful to your car’s clear coat because they create micro-scratches that compromise its integrity. These fine abrasions can deepen over time, making the clear coat more vulnerable to oxidation and contaminants.
If you don’t address them promptly, the damage worsens, potentially leading to costly repairs. To protect your paint, regularly inspect the surface and use proper washing and maintenance techniques to prevent further degradation.
Can Swirl Marks Be Removed Without Professional Equipment?
You don’t need a pro’s toolbox to gently refresh your car’s finish. With patience, you can manually polish swirl marks using products like Scratch X and microfiber or foam applicator pads.
Start by thoroughly washing and claying the surface. Then, apply polish in small, controlled circular motions.
Finish with quality wax to protect the clear coat. This careful approach helps restore shine without specialized machinery, keeping your paintwork smooth and glossy.
Do Swirl Removers Work on Other Surfaces Besides Cars?
You can use swirl removers primarily on car paint, as their mild abrasives target automotive finishes effectively. Using them on other surfaces, like fiberglass or wood, isn’t generally recommended because those materials may react differently and risk damage.
To avoid harm, test on a small area first or choose products specifically designed for non-car surfaces. Always consider the material’s sensitivity and use appropriate abrasives tailored to that surface type.
Swirl-Free Paint, Lasting Impressions
Swirl marks can reduce your car’s paint clarity by up to 40%, making proper removal essential. By preparing your car thoroughly, selecting the right polishing products, and using a buffer correctly, you’ll restore a smooth, glossy finish efficiently. Remember to apply wax afterward to protect your work and prevent future damage. Consistent care and correct techniques not only eliminate swirl marks but also maintain your vehicle’s value and appearance over time.