To tape up a broken car window, first carefully remove loose glass and clean the surface thoroughly to guarantee good adhesion. Use clear packaging tape or strong automotive tape, cutting strips slightly larger than the damaged area. Apply vertical strips with firm, overlapping pressure, then reinforce with horizontal strips to create a sealed barrier. Seal all edges carefully to prevent moisture and debris entry. For larger openings, add heavy-duty plastic sheeting secured with weather-resistant tape. Proper preparation and application ensure a durable, temporary fix—learn how to optimize each step for safety and longevity.
Key Takeaways
- Clean the window area thoroughly and remove all loose glass shards before applying tape to ensure strong adhesion and safety.
- Use clear packaging tape or strong automotive tape with good weather resistance for temporary window sealing.
- Cut tape strips slightly larger than the damaged area and apply vertically with overlaps, then reinforce with horizontal strips for durability.
- For large openings, cover with heavy-duty clear plastic sheeting secured firmly by overlapping weather-resistant tape around all edges.
- Regularly inspect and maintain the tape seal, replacing or reinforcing it until you can get a permanent window repair.
Preparing the Window Area for Repair
Before you start taping a broken car window, you need to prepare the window area thoroughly to guarantee a secure and lasting repair.
First, remove all loose glass shards carefully using pliers or gloved hands to prevent injury and further damage.
Use a soft brush or vacuum to clear debris from the frame and surrounding area. Regular cleaning helps maintain filtration efficiency, which is crucial for preventing dirt and particles from affecting the adhesive’s hold.
Gently remove all debris from the window frame and nearby surfaces using a soft brush or vacuum cleaner.
Clean the surface meticulously with glass cleaner to eliminate dirt, grease, and residue, then dry it with a lint-free cloth to remove moisture. Ensuring the surface is free of contaminants is essential for the tape to adhere properly and prevent the repair from failing due to contaminant removal.
Avoid touching the glass afterward to prevent oil contamination.
Next, remove old adhesive with a razor blade or scraper, then clean the frame edges with rubbing alcohol.
Finally, cover the car’s interior near the window to protect from falling glass and ensure the vehicle is parked in a dry, shaded, stable spot.
Selecting the Right Tape for the Job
When selecting tape for a broken car window, focus on types that combine strong adhesion with reliable weather resistance. Clear packaging tape offers visibility and moisture protection, while duct tape provides durability for less visible areas. Understanding each tape’s properties guarantees you choose the most effective material for your temporary repair.
It is important to avoid using duct tape on the window frame to prevent paint damage or adhesive residue. Considering the balance between performance and filtration efficiency in materials can help ensure a secure and lasting temporary fix.
Tape Types Comparison
Although selecting the right tape for repairing a broken car window depends on your specific needs and conditions, understanding the strengths and limitations of each tape type guarantees an effective temporary fix.
Clear packaging tape offers transparency and easy crosshatch application, ideal for driver/passenger windows in mild weather. Its lightweight nature makes it convenient for quick, temporary fixes without adding bulk.
Plastic crash wrap covers large rear windows well but reduces visibility and requires cutting to size. This tape is less durable in extreme temperatures compared to options like AGM battery temperature performance.
Butyl tape excels in adhesion, flexibility, and moisture resistance, suitable for sealing edges but not visible areas due to its dark color.
Avoid duct or Gorilla tape since they leave residue, degrade outdoors, and block visibility.
Specialty auto glass tapes provide professional-grade sealing but are costly and complex, better reserved for permanent repairs than quick fixes. These tapes often come as part of a set including tape and mouldings essential for securing glass during repairs or replacements.
Choose based on location, size, and desired durability.
Weather Resistance Importance
Why does weather resistance matter so much when selecting tape for a broken car window? Because the tape must withstand environmental challenges while maintaining a secure seal. Without weather-resistant properties, water can seep inside, damaging electronics and upholstery.
You need tape that preserves adhesion and strength in rain, snow, and fluctuating temperatures. Many outdoor products are designed with rugged construction to endure such conditions effectively.
Focus on these critical features when choosing your tape:
- Waterproof backing and aggressive adhesive that bonds to wet or uneven surfaces
- UV resistance to prevent deterioration and discoloration under sunlight
- Temperature tolerance ensuring reliable adhesion in freezing or hot conditions
These qualities ensure the tape remains durable, blocks drafts, protects your vehicle’s interior, and keeps the temporary repair intact until you can install a permanent fix. Additionally, a tape with long-lasting holding power and a puncture-resistant backing is essential for a secure and lasting seal.
Measuring and Cutting Tape Strips
You’ll want to measure the broken window area precisely, adding extra length to guarantee secure anchoring and complete coverage. Choose sharp scissors or a utility knife to cut clean, straight strips on a stable surface for accuracy. Avoid cutting tape too short or stretching it during cutting to maintain proper adhesion and a tight seal.
It is also important to measure glass thickness accurately to select the right tape thickness for an effective repair. Proper sealing helps prevent contaminants from entering, similar to how an engine air filter protects a vehicle’s engine.
Tape Length Accuracy
When preparing to tape a broken car window, measuring and cutting tape strips with exact length is essential to make certain full coverage and secure adhesion. You need to assure each strip extends slightly beyond the damaged area to allow proper overlap and seal. Using high-quality sealing materials can enhance durability and prevent leakage.
Cut strips cleanly and straight to prevent peeling and maintain effectiveness. Consider window frame contours to avoid gaps or wrinkles during application.
To achieve precise tape length accuracy:
- Measure twice before cutting, using a reliable tool or careful estimation.
- Prepare multiple strips in advance, matching damage dimensions for efficiency.
- Adjust lengths for vertical and horizontal strips to cover fully without slack.
Additionally, cleaning the surface thoroughly with a clean, dry cloth before taping improves adhesion and helps eliminate dust and moisture that could compromise the tape’s hold.
Applying these steps guarantees a durable, airtight seal that withstands environmental exposure and vibration.
Cutting Tools Choice
Although selecting the right cutting tools might seem straightforward, choosing equipment tailored to tape material and application guarantees clean, precise cuts and maintains tape integrity. For automotive-grade tapes, use sharp scissors or blades with clean edges to avoid fraying and compromised adhesion.
For example, professional-grade cutting tools such as cold knife blades provide durability and precision essential for clean tape cuts. Additionally, ensuring filter performance precision in cutting tools parallels the meticulous standards needed in automotive maintenance.
Heavier or wider tapes demand sturdier, industrial-grade cutters or oscillating tools like the Astro Pneumatic ONYX for smooth, straight cuts. Measure window dimensions accurately, mark cutting lines lightly on the tape backing, and cut strips on a stable, clean surface to ensure uniform sizing.
Avoid household knives that can cause jagged edges. Maintain your tools regularly, wear gloves and eye protection, and consider ergonomic handles for control and reduced fatigue during repetitive cuts. Preparing pre-cut strips speeds up taping and improves application consistency.
Applying Vertical Tape Strips to the Broken Window
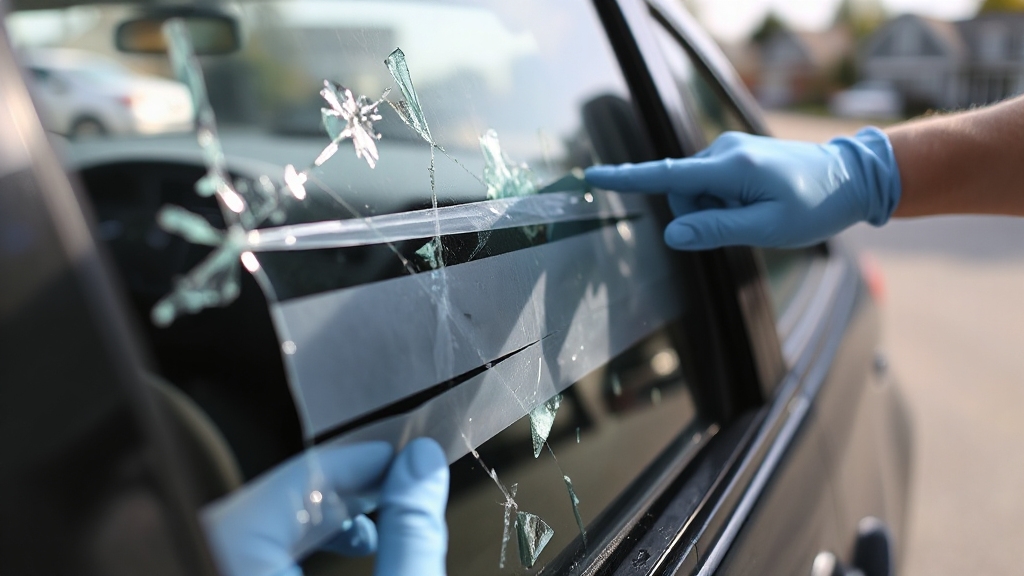
Before applying vertical tape strips to your broken car window, make certain the surface is clean and free of loose glass shards to promote strong adhesion and safety. Use clear packaging tape and pre-cut strips to the window’s height for efficient application.
Start at one edge, applying each strip vertically with slight overlap to create a continuous seal. Apply firm pressure to eliminate air bubbles and ensure the tape adheres well to both the glass shards and window frame. Applying a protective barrier is similar to using Paint Protection Film to shield surfaces from damage.
Key steps include:
- Work from inside the vehicle for better control and alignment.
- Maintain tension on the tape to prevent sagging and gaps.
- Cover the entire broken area with multiple vertical strips for stability. Make sure to apply tape around the entire perimeter of the window to create a complete seal and prevent debris or water from entering. tape sealed perimeter
This method provides a weather-resistant, temporary barrier while maintaining visibility.
Reinforcing With Horizontal Tape Strips
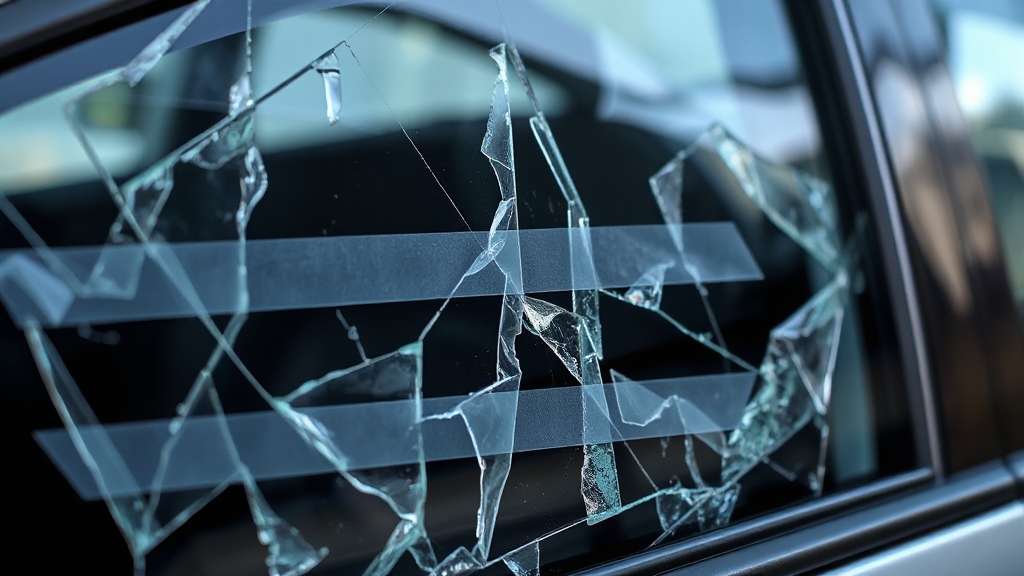
Since vertical tape strips form the initial barrier, reinforcing them with horizontal tape strips considerably strengthens the temporary patch. You should apply horizontal strips across the vertical ones, overlapping by at least half their width to secure a cohesive lattice.
Use clear packing tape, 2-3 inches wide, trimmed to span from frame edge to edge, following the window’s contour for maximum adhesion. Press each strip firmly, smoothing out air bubbles with your fingers or a flat tool, applying pressure evenly from center outward to prevent wrinkles. This method is similar to how bulk purchases of synthetic oil improve overall efficiency and protection in maintenance tasks.
For extensive damage, consider double layering horizontal strips. This reinforcement distributes stress evenly, improves weather resistance, and helps block wind, rain, and debris. Before applying tape, make sure to clear the interior of all glass shards to prevent injury and ensure better tape adhesion.
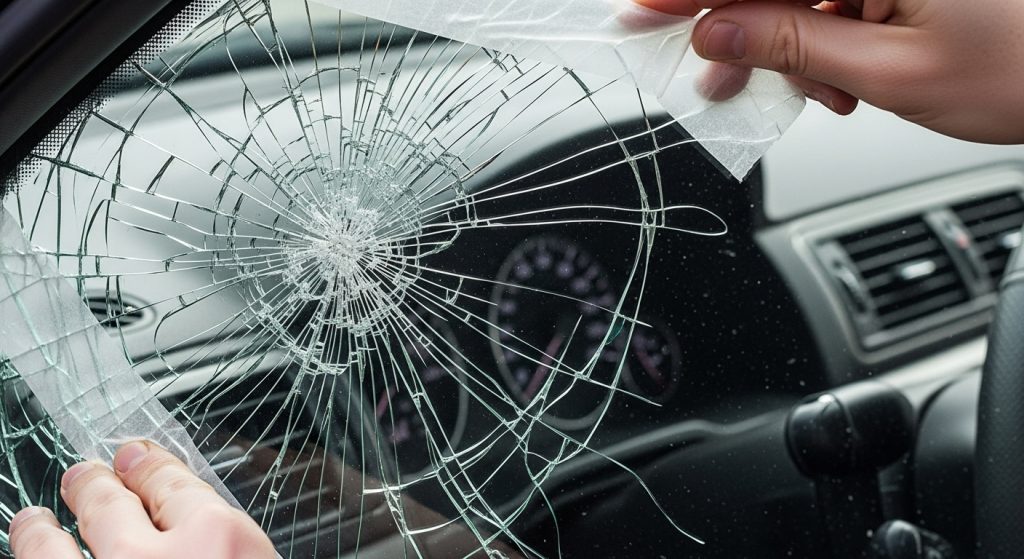
Sealing the Edges and Checking for Gaps
After reinforcing the broken window with horizontal tape strips, focus on sealing the edges to create a secure, weatherproof barrier. Start by cleaning the window frame thoroughly, removing loose shards, wiping dust and moisture, and using isopropyl alcohol for grease-free surfaces.
For vintage vehicles, using glass setting tape designed for sealing glass into stainless steel trim can offer a durable and historically accurate option. Proper sealing is crucial as it prevents contaminants from entering, similar to how well-maintained air cleaner elements protect an engine from damage.
Once dry, apply clear packaging tape along the edges, overlapping strips by a few inches and pressing firmly to eliminate air bubbles.
- Inspect all taped edges from inside and outside for gaps or lifting.
- Patch any weak spots or holes with smaller tape pieces.
- Ensure continuous tape coverage around the entire frame, overlapping corners for strength.
Perform a final check to confirm no openings remain that could let in wind or rain. This precise sealing maintains protection until professional repair.
Using Plastic Sheeting for Large Openings
When covering large car window openings, selecting the right plastic sheeting is crucial to guarantee durability and visibility. Choose clear, heavy-duty plastic like vinyl sheets or shower curtains for better protection and weather resistance.
Measure the window accurately, then cut the plastic at least half an inch larger on all sides, ensuring clean, straight edges to facilitate taping.
Measure precisely and cut plastic slightly larger with clean edges to ensure easy and secure taping.
Remove all glass shards beforehand to improve tape adhesion and safety. Wearing gloves and safety glasses during this process helps prevent injuries from sharp glass fragments.
Lay the plastic taut over the opening, avoiding wrinkles, and secure it with strong, weather-resistant tape like duct or gorilla tape.
Apply overlapping strips along all edges, taping both inside and outside for a watertight seal.
This approach balances flexibility with robust coverage, maintaining visibility while protecting the interior effectively.
Ensuring Safety and Durability of the Temporary Fix
Although a temporary fix can never fully replace a proper window repair, ensuring safety and durability starts with selecting the right tape and preparing the damaged area meticulously.
Use high-quality automotive glass tape or clear packing tape with some elasticity to endure vibrations and weather changes. JTAPE Seal Wrap provides an effective temporary solution that can protect the interior from outside elements until permanent repair. temporary protection
Clean and dry the glass thoroughly, removing loose shards and dirt to maximize adhesion. Apply tape with firm pressure, overlapping strips horizontally and vertically for a strong seal.
- Choose tape wide enough to cover damage with extra overlap to block moisture and debris.
- Reinforce edges with additional tape layers to prevent peeling in wind or rain.
- Maintain clear tape for visibility and smooth application to avoid glare or distractions while driving.
Maintaining and Inspecting the Taped Window Repair
To maintain the effectiveness of your taped window repair, you should regularly inspect the tape for any signs of peeling, lifting, or damage that could compromise the seal. Check for new cracks, tears, or holes, and watch for moisture trapped beneath the tape, which indicates seal failure.
Keep the tape taut and free of wrinkles by smoothing out air bubbles. Clean the surrounding surface frequently to enhance adhesion, removing dust, grease, or moisture before applying extra tape if needed. Using a high-quality tape can significantly improve the temporary protection of the damaged window.
Keep tape smooth and clean surfaces regularly to maintain strong adhesion and effective sealing.
After exposure to weather, reinforce or replace worn tape promptly to prevent water infiltration. Ensure the tape doesn’t obstruct visibility or interfere with window operation.
Monitor the repair’s condition closely and prepare for permanent replacement without relying on the tape as a long-term solution.
Frequently Asked Questions
Can I Drive My Car Immediately After Taping the Broken Window?
Driving right after taping a broken window is like patching a leaky boat with duct tape—you might stay afloat briefly, but it’s not safe or reliable.
You shouldn’t drive immediately because taped coverings don’t restore visibility or structural integrity. Sharp glass shards may remain, and the tape can fail under wind pressure.
Only drive for essential trips, guarantee clear sightlines, and schedule professional repairs promptly to meet legal and safety standards.
How Long Can a Taped Window Repair Last Before Professional Replacement?
A taped window repair typically lasts a few days up to two weeks under mild conditions. Factors like tape quality, weather exposure, and break size affect its durability.
You shouldn’t rely on tape long-term since it won’t restore structural integrity or fully seal the window. For safety and security, schedule a professional replacement within 24-48 hours if possible.
Prolonged use risks further damage, leaks, and compromised vehicle security.
Is It Safe to Use Colored or Decorative Tape on Car Windows?
Sure, slap some glittery tape on your car window if you want to blind yourself and everyone else on the road.
In reality, colored or decorative tapes aren’t designed for automotive use—they lack weather resistance, proper adhesion, and can impair visibility.
Stick with clear, durable tapes like duct or packaging tape to maintain safety, legal compliance, and effective protection until you get professional glass repair.
Safety first, sparkle later.
Can Taping a Window Affect Car Insurance Claims After an Accident?
Taping a broken window won’t negatively impact your car insurance claim as long as you use it as a temporary measure to protect your vehicle. Insurers expect you to mitigate further damage by covering the window securely with plastic and tape.
This step helps prevent weather damage or theft, supporting your claim’s success. Just guarantee you schedule prompt repairs, since tape is only a short-term solution and doesn’t replace professional fixes.
What Should I Do if Tape Leaves Adhesive Residue on the Window Frame?
Did you know that 80% of adhesive residues can be removed effectively with household solutions?
If tape leaves adhesive residue on your window frame, start by applying heat with a hairdryer to soften it.
Then, use rubbing alcohol on a cloth to dissolve the sticky bits gently.
Follow up by wiping the area with glass cleaner to restore clarity.
Always test removers on a small spot first to prevent damage.
Your Next Steps: Monitor and Maintain
By carefully choosing strong, sturdy tape and systematically sealing shattered spots, you’ll secure a safe, stable shield against the elements. Remember to regularly review your repair, reinforcing rips and resealing edges to retain reliability. This temporary technique tames turbulence and thwarts threats until professional help patches your pane permanently. Stay sharp, stay safe, and swiftly strengthen your broken window with smart, simple steps that save stress and safeguard your space.