
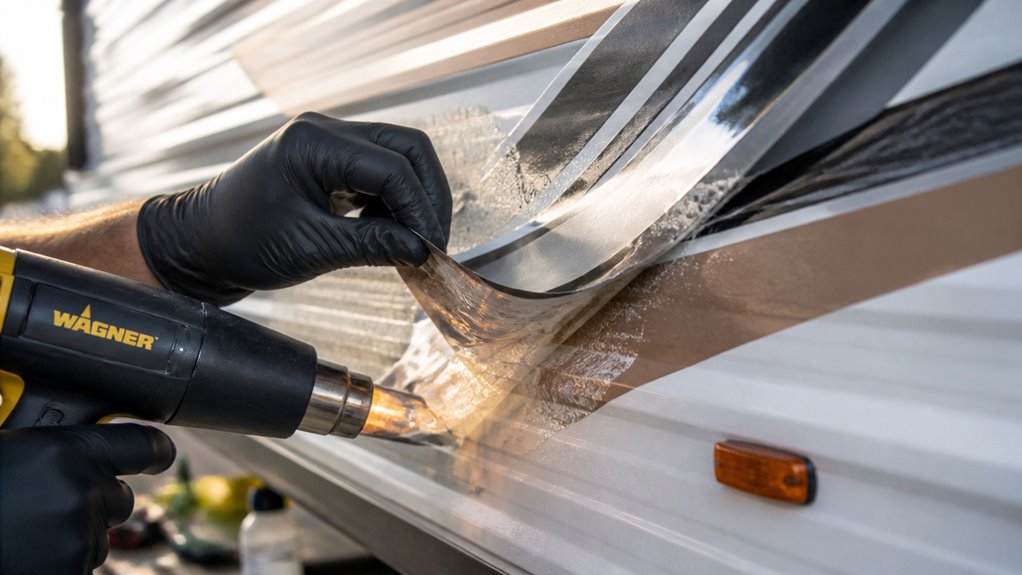
Start by cleaning your trailer surface and working in a well-ventilated area with gloves and eye protection. Use a heat gun or hair dryer on low to soften the decal evenly without overheating.
Gently peel the decal at a shallow angle, using plastic scrapers to lift stubborn edges. Apply Goo Gone sparingly to soften adhesive residue, then follow with mineral spirits if needed.
Finish by cleaning and waxing the surface to restore shine. Continuing through this guide, you’ll gain detailed steps and tips for a flawless removal.
Key Takeaways
- Clean and dry the trailer surface thoroughly and work in a well-ventilated area using protective gloves and eyewear.
- Use a heat gun on low setting or hair dryer to soften decals, moving steadily and avoiding overheating or burn marks.
- Gently peel warmed decals by hand at a shallow angle, using plastic scrapers to lift stubborn vinyl without scratching the surface.
- Apply Goo Gone sparingly to soften adhesive residue, followed by mineral spirits, testing solvents on inconspicuous areas first.
- Clean the surface with rubbing alcohol after residue removal, then apply a protective wax to restore and preserve the finish.
Prepare Your Trailer and Tools for Safe Decal Removal

Before you begin removing decals from your travel trailer, make sure the work area is clean and dry to maximize the effectiveness of chemical solvents and adhesives.
Put on heat-resistant gloves to protect your hands during the process.
Test any adhesive remover on a small, hidden section of the trailer’s sidewall to confirm it won’t damage the surface.
Use plastic razor blades instead of metal to avoid scratching or gouging fiberglass or camper shell material.
Have all tools, such as plastic scrapers, putty knives, and chemical solvents, within reach to work efficiently.
Assure proper ventilation and keep flammable solvents away from ignition sources.
Double-check that your heat gun, if used later, is set to low to prevent overheating.
After decal removal, consider applying a protective wax formulated for gelcoat surfaces to preserve your trailer’s finish and prevent UV damage.
Soften Decals Using Heat Guns and Hair Dryers
When you’re looking to soften decals, it’s best to start with a heat gun on the low setting. Just keep it moving steadily across the decal. This way, you can soften the adhesive without overheating the surface.
If you’re working on smaller sections, a hair dryer can do the trick too! It provides just the right amount of heat without the risk of causing any damage. Just remember to hold the heat source at a safe distance. You want to avoid any warping or burn marks, but still make sure the vinyl loosens up for an easier removal.
Using heat properly also helps prevent surface damage during the removal process.
Heat Gun Techniques
Apply gentle, consistent heat to soften decals and loosen their adhesive for easier removal. Set your heat gun on low to avoid damaging the trailer’s surface.
Hold the gun several inches away from the decal, moving it back and forth evenly across the graphic. This prevents overheating and warping.
As the vinyl warms, test peeling a corner by hand. If it resists, reapply heat briefly before trying again.
Avoid focusing heat on one spot for too long to prevent burn marks. Use heat-resistant gloves to protect your hands during this process.
Once the decal softens and lifts, proceed carefully, combining heat with plastic scrapers as needed to avoid gouging the fiberglass or paint beneath.
This controlled heat method guarantees effective, damage-free decal removal. Ensure you maintain proper ventilation and wear protective gear such as gloves and goggles during the process for safety.
Hair Dryer Alternatives
Utilizing a hair dryer offers a practical alternative for softening decals when a heat gun isn’t available or for smaller, more delicate areas on your travel trailer.
Position the hair dryer approximately 6-8 inches from the decal, set to the highest heat setting, and move it back and forth evenly to avoid overheating any single spot.
Apply consistent heat for several minutes until the vinyl softens and the adhesive loosens.
Avoid holding the dryer too close to prevent surface damage or warping.
Once heated, gently peel the decal by hand; if resistance persists, reapply heat.
For stubborn residue, follow up with a plastic scraper.
Remember to wear heat-resistant gloves and work in a clean, dry environment to guarantee safety and maintain the trailer’s surface integrity throughout the process.
Ensure stable temperature and humidity conditions during the process to prevent unexpected adhesive behavior caused by environmental factors.
Peel Off Decals by Hand to Minimize Residue
Start by gently peeling off the decal by hand after warming it with heat to loosen the adhesive.
Apply steady, even pressure, lifting the edge slowly to avoid tearing or leaving excessive residue behind.
If the decal resists, reapply heat to soften the glue further before continuing. This method reduces leftover adhesive and eases cleanup.
Keep these points in mind:
Warm the surface uniformly to prevent warping or burn marks.
Peel at a shallow angle to minimize stress on the trailer’s finish.
Work in small sections to maintain control and assess progress.
Use heat-resistant gloves to protect your hands during the process.
After removal, thoroughly clean the area and protect the surface with wax or polish to maintain the finish.
This approach guarantees a clean removal with minimal adhesive residue, preparing the surface for any further cleaning or restoration steps.
Use Plastic Scrapers to Remove Stubborn Decals and Vinyl
Employ plastic scrapers to carefully lift stubborn decals and vinyl that won’t come off by hand after heating.
Use plastic scrapers to gently lift heated decals that resist manual removal.
Select a scraper with a thin, flexible edge to minimize surface damage.
Hold the scraper at a shallow angle and gently work it under the decal’s edge, applying steady pressure to avoid gouging the trailer’s finish.
Progress gradually, reheating sections as needed to soften adhesive and ease removal.
Avoid metal blades; they can scratch fiberglass or painted surfaces.
If resistance increases, pause and reapply heat before continuing.
Use overlapping strokes to lift the decal uniformly, preventing tearing that leaves fragments behind.
Maintain a clean working surface to prevent debris from scratching.
Once the vinyl is removed, inspect for remaining adhesive before moving on to residue cleanup techniques.
For best results and to avoid damage, ensure tools and techniques are appropriate for the specific fabric type or surface of your travel trailer.
Remove Adhesive Residue With Goo Gone and Mineral Spirits
To tackle that stubborn adhesive residue left behind after removing a decal, you’ll want to start by applying Goo Gone. It really helps to soften up that pesky residue. Just remember to work in a well-ventilated area—safety first!
Once you’ve done that, you can take it a step further with some mineral spirits. This will help break down any remaining adhesive. Before you dive in, though, it’s a good idea to test it out on a small, inconspicuous area first.
When you’re ready to go, grab a plastic tool to carefully scrape away the softened residue. This way, you’ll achieve an effective and clean finish without risking damage to the surface. Happy cleaning!
Regular maintenance and cleaning can prevent long-term damage like paint corrosion caused by stubborn residues and environmental contaminants.
Goo Gone Application Tips
When adhesive residue lingers after decal removal, applying Goo Gone can effectively break down the sticky remnants. Its effectiveness varies depending on the adhesive type.
To optimize results, apply Goo Gone sparingly and allow it to penetrate for several minutes before wiping. Always test on a small, hidden area to ensure it won’t damage your trailer’s surface.
Use a soft cloth or plastic scraper to gently lift softened residue without scratching. Afterward, clean the area with mild soap and water to remove any oily film.
Apply Goo Gone in thin layers for even coverage. Avoid excessive rubbing to prevent surface abrasion. Use a plastic scraper for stubborn residue after soaking. Work in a well-ventilated area to minimize inhaling fumes.
To further protect your trailer’s paint, avoid abrasive scrubbing as even low-load rubbing can cause micro-abrasions that degrade the surface over time.
Mineral Spirits Usage
After using Goo Gone to break down adhesive residue, mineral spirits serve as an effective next step to further soften and remove stubborn adhesive.
Begin by applying a small amount of mineral spirits to a clean cloth or paper towel. Gently dab the affected area, allowing the solvent to penetrate and loosen the remaining adhesive.
Avoid saturating the surface to prevent damage to the travel trailer’s finish. Let it sit for several minutes to maximize softening.
Use a plastic scraper or putty knife to carefully lift the loosened residue, working methodically to avoid scratching.
Repeat the application and scraping process as needed until adhesive traces are minimal. Finally, wipe the area clean with a dry cloth to remove solvent residues before proceeding to the next cleaning step.
For best results, ensure you work in a well-ventilated area and wear appropriate safety gear during the process.
Effective Residue Removal
Tackle adhesive residue by applying Goo Gone first to break down the sticky buildup effectively. Let it sit for several minutes to soften the adhesive before wiping it away with a clean cloth. If residue persists, use mineral spirits to further dissolve stubborn adhesive.
Apply mineral spirits sparingly with a cloth, allowing it to penetrate the residue without harming the trailer’s surface. After softening, scrape gently with a plastic putty knife to avoid damage.
Test Goo Gone and mineral spirits on a hidden spot to make sure no surface damage. Work in a well-ventilated area and wear gloves to protect your skin. Avoid metal scrapers; use plastic tools to prevent scratches.
Clean the area afterward with rubbing alcohol to remove any solvent traces and prepare for waxing. Always handle chemicals in well-ventilated areas while wearing protective gloves and eyewear to ensure safety.
Clean and Restore Your Trailer’s Surface After Decal Removal
Although the decals are removed, your work isn’t complete until you thoroughly clean and restore the trailer’s surface.
Start by wiping away any rubber residue left from eraser wheels using a damp cloth.
Follow with a cleaning solution like LA’s Totally Awesome to eliminate remaining adhesive traces.
Afterward, apply 70% rubbing alcohol to make certain the surface is free of oils or solvents.
Inspect for temporary burn marks caused by removal tools; these typically disappear with time and gentle cleaning.
Once the surface is spotless and dry, apply a high-quality wax to restore the trailer’s shine and protect the exterior from environmental damage.
This methodical approach makes certain your trailer’s finish is smooth, clean, and ready for any further treatment or decal reapplication.
Choose the Best Tools and Products for Decal Removal
When you set out to remove decals from your travel trailer, choosing the right tools and products can make the process markedly smoother and prevent damage to the surface. You’ll want equipment that balances efficiency with surface safety.
Selecting the right tools ensures decal removal is efficient while protecting your travel trailer’s surface.
Start with a heat gun set on low or a hair dryer to soften adhesives without overheating. Use plastic scrapers or putty knives for mechanical removal to avoid scratching fiberglass or paint. For stubborn adhesive, select chemical softeners like GraphXOff or mineral spirits, testing them first on an inconspicuous area.
Drill-powered eraser wheels, such as 3M or Wonder Wheels, provide controlled abrasion without excessive heat or pressure.
Key tools and products include:
- Heat gun or hair dryer for adhesive softening
- Plastic scrapers and putty knives for safe scraping
- GraphXOff or mineral spirits for adhesive removal
- 3M or Wonder Wheel eraser wheels with a corded drill
Avoid Damage and Troubleshoot Common Decal Removal Issues
To prevent damage during decal removal, you must carefully control heat application and select appropriate tools tailored to your trailer’s surface.
Always use a heat gun on low, maintaining distance to avoid warping or burn marks. Opt for plastic scrapers over metal to protect fiberglass or painted surfaces.
If decals resist peeling, reapply heat gradually rather than forcing removal. When adhesive residue remains, test solvents on a small area before full application to avoid discoloration.
Address stubborn adhesive with mineral spirits or specialized removers like GraphXOff, allowing sufficient dwell time before scraping. If eraser wheels cause temporary burn marks, know they usually dissipate quickly.
Consistent, methodical steps reduce risks and improve results, ensuring your trailer’s finish stays intact throughout the process.
Frequently Asked Questions
Can Decals Be Removed in Cold Weather Without Damaging the Trailer?
Yes, you can remove decals in cold weather, but you’ll need to take extra precautions.
Cold temperatures make adhesives harder and less pliable, so heating the decal gently with a heat gun or hair dryer is vital before peeling.
Keep the heat low to avoid damaging the trailer’s surface. Use plastic scrapers and test adhesives on small areas.
Working methodically guarantees you won’t harm the trailer during removal despite the cold.
How Long Should I Wait After Waxing Before Applying New Decals?
Patience preserves perfect placement. After waxing your travel trailer, you should wait at least 24 to 48 hours before applying new decals.
This waiting window allows the wax to fully cure and bond, preventing decal adhesion issues or bubbling.
Make certain the surface is clean, dry, and free from wax residue before decal application.
Following this methodical measure guarantees a smooth, secure seal and a sleek, shiny finish on your trailer’s surface.
Are There Eco-Friendly Adhesive Removers Safe for RV Surfaces?
Yes, you can use eco-friendly adhesive removers safe for RV surfaces.
Look for plant-based solvents or citrus-derived products, which effectively soften adhesives without harsh chemicals.
Always test the remover on a small, hidden area to make certain it won’t damage your RV’s finish.
Apply it sparingly, let it sit briefly to soften residue, then use a plastic scraper for removal.
This method minimizes environmental impact while preserving your RV’s exterior integrity.
Can I Use a Heat Gun on Painted Metal Surfaces?
Think of a heat gun as a gentle sun warming metal rather than a scorching flame.
Yes, you can use a heat gun on painted metal surfaces, but keep the temperature low and move it continuously to avoid overheating.
Hold it several inches away, sweeping back and forth evenly.
This controlled approach softens adhesives without blistering paint or warping metal.
It preserves the surface’s integrity while easing decal removal efficiently and safely.
What Is the Best Way to Dispose of Removed Decal Materials?
The best way to dispose of removed decal materials is to first collect all vinyl scraps and adhesive residues in a sealed plastic bag to prevent environmental contamination.
Avoid flushing adhesives or solvents down drains.
For chemical-soaked rags, use a fireproof container and follow local hazardous waste disposal regulations.
Check your municipality’s guidelines for disposing of plastic and chemical waste responsibly to minimize environmental impact and comply with safety standards.
Protect and Maintain Your Travel Trailer After Decal Removal
Removing decals from your travel trailer is like peeling back layers to reveal a fresh canvas.
By preparing your tools, softening decals with heat, and carefully peeling them off, you minimize damage and residue.
Use plastic scrapers and solvents like Goo Gone to tackle stubborn spots.
Finish by thoroughly cleaning the surface to restore its shine.
With the right methods and patience, you’ll maintain your trailer’s integrity and keep it looking pristine for the road ahead.


